Why should you use the terminal as a data scientist?
There is not a more productive or versatile tool for developers to use – the terminal is the swiss-army knife of the developers' tool kit.
The terminal can be a one-stop-shop for your daily tasks. Code editing, launching programs, multi-tasking, scripting, system admin and much more. Command line expertise frees you from restrictive GUI tools and endless mouse clicks. Opening a world of efficiency and automation.
But the command line can be intimidating and unforgiving for the uninitiated.
The monochrome UI of the default terminal takes no prisoners. No syntax highlighting and no autocompletion to hold your hand. Who knows whether the command you are typing is correct?
Yet, small tweaks to the configuration go a long way to improving the user experience. Turning the command line into a powerful tool to supercharge your workflow.
The key is to invest a little bit of time customising your terminal with plugins. A couple hours tailoring your terminal will pay huge dividends down the line.
Key features to enable productivity
Customising the terminal is a very personal thing.
Everyone has aesthetic preferences and different functional requirements depending on their tech stack. But I would consider the following terminal attributes important for boosting productivity:
- a prompt displaying key information (e.g. git information, virtual environment, Python version)
- syntax highlighting
- auto-completion
- window and session management
- efficient directory jumping and file system navigation
- a nice aesthetic – if you don’t enjoy using it, you probably won’t bother
In this post I will go through the key oh-my-zsh plugins I use to achieve the above functionality and transform the command line into a productive environment.
Let’s get into it!
Prerequisites
I am using MacOS and iterm2 for this setup, however, it should be possible to install and configure this setup across operating systems.
I will be using Homebrew to install most of the plugins and command line tools. But, for each tool, I will also provide links to documentation with instructions for specific operating systems.
Configure the Prompt
1. oh-my-zsh
The MacOS terminal prompt ships with z shell (zsh) as the default shell.
Oh My Zsh is an open source framework for managing your zsh configuration. It provides easy access to many great plugins which can improve your terminal experience and supercharge your productivity.
“Oh My Zsh will not make you a 10x developer…but you may feel like one!"
oh-my-zsh documentation
We will use oh-my-zsh to manage and install plugins for the rest of the terminal setup described in this post.
You can install oh-my-zsh using the following command (full instructions and documentation on their website ):
# install oh-my-zsh
sh -c "$(curl -fsSL https://raw.github.com/ohmyzsh/ohmyzsh/master/tools/install.sh)"
Installing oh-my-zsh will create/update your ~/.zshrc file – located in your home directory – which defines your zsh configuration. We will edit the ~/.zshrc file throughout this tutorial to customise our terminal.
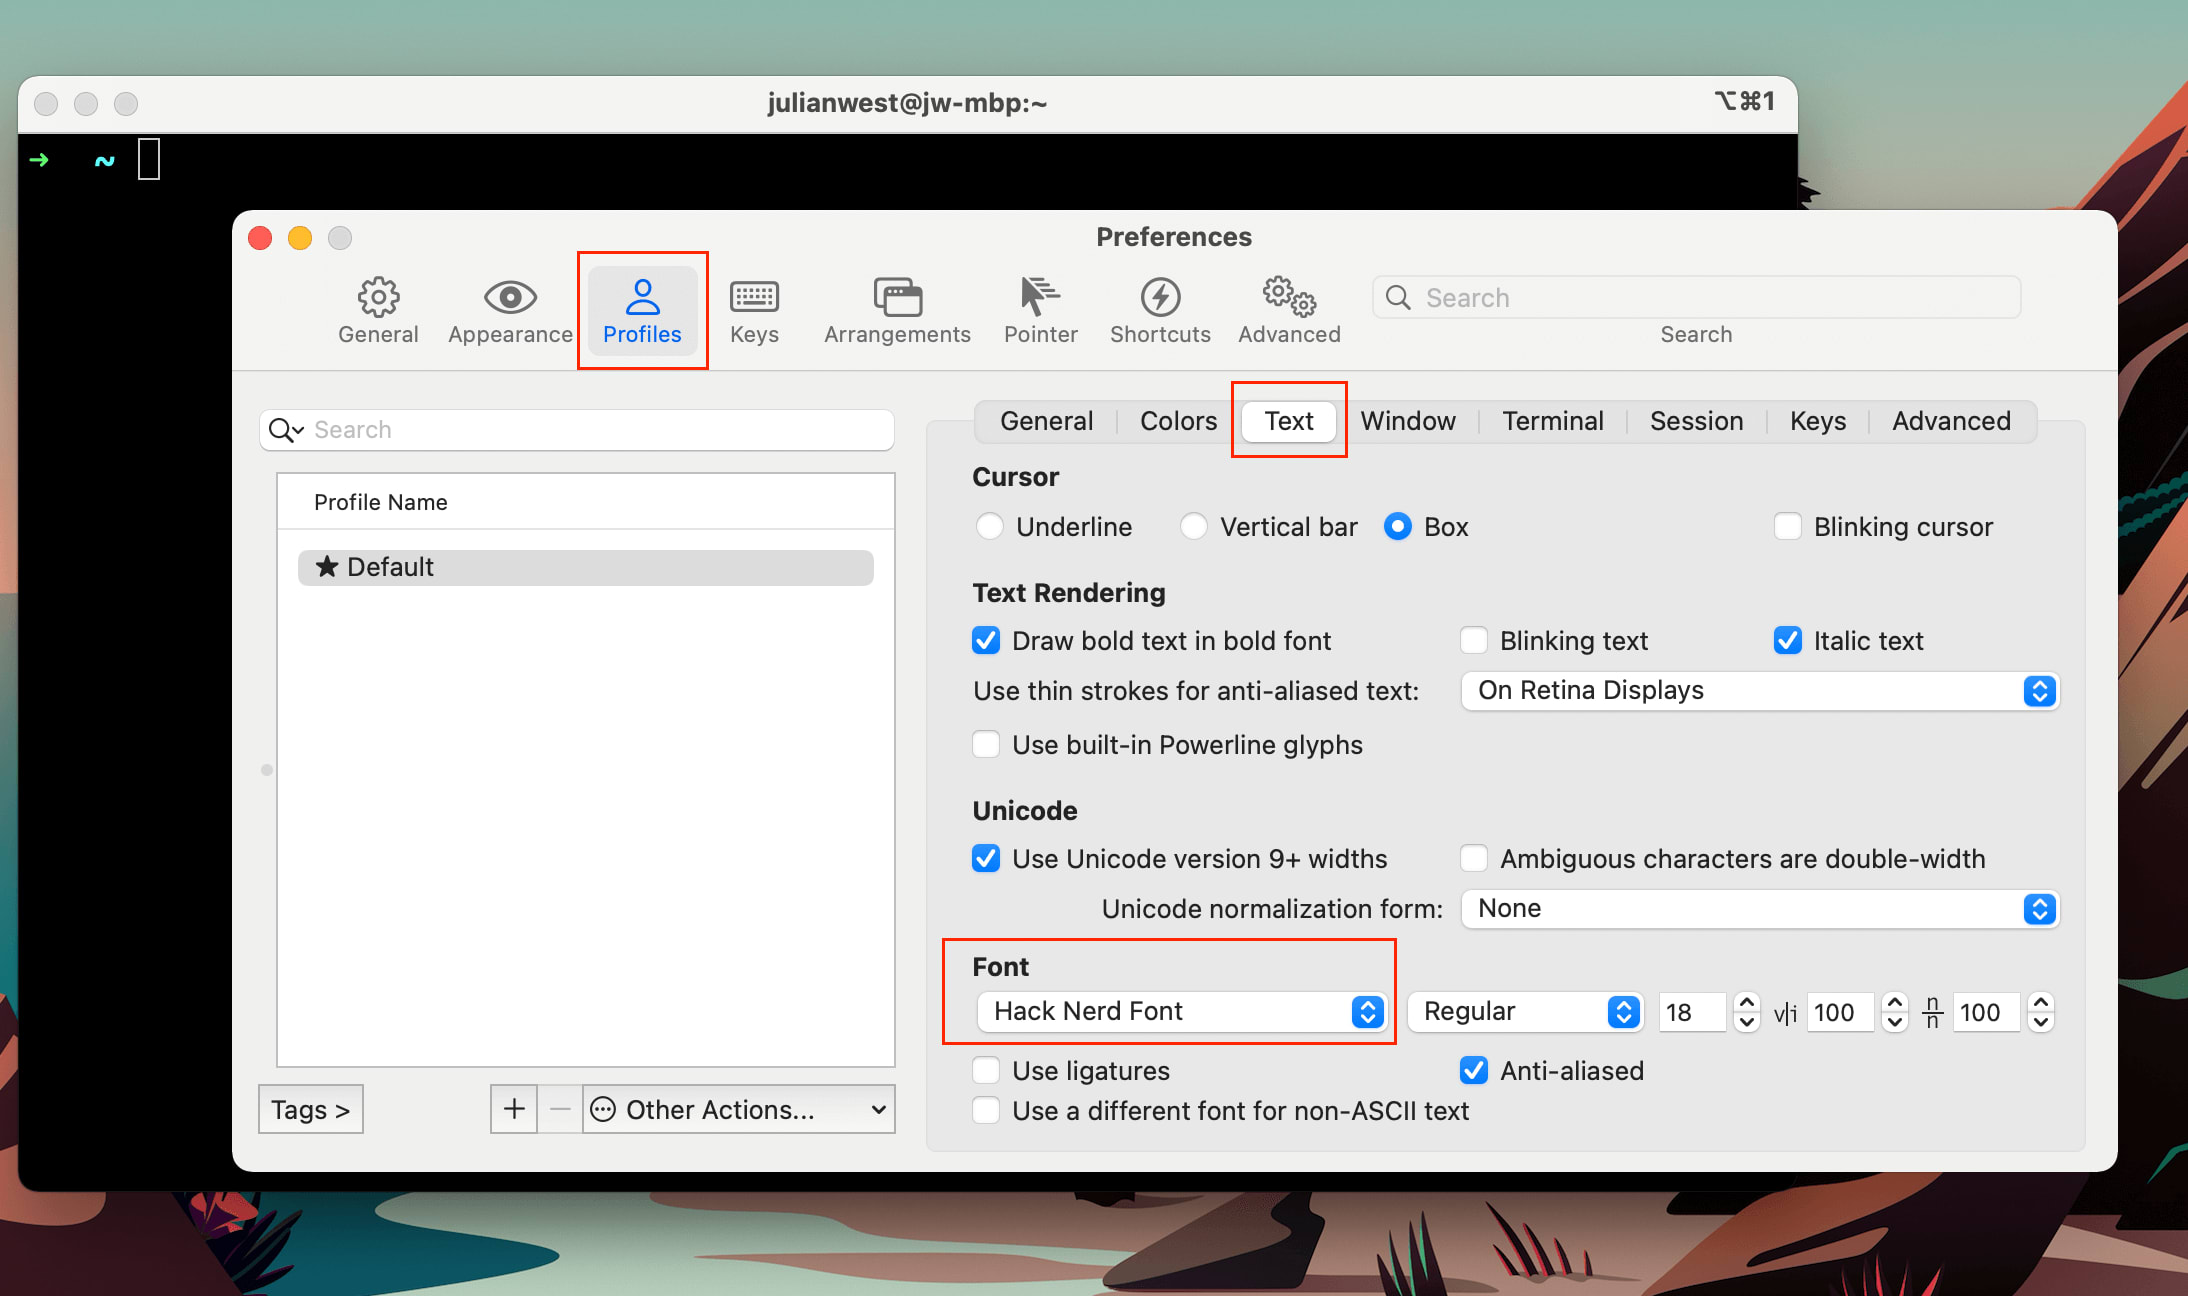
2. Download a Nerd-Font
Next, download a Nerd-font of your choice.
Nerd fonts provide many great fonts for your terminal which are patched to support icons. We will need a patched font later to render dev icons in the terminal and get that great aesthetic look.
You can follow instructions on the Nerd-font GitHub page to install a patched font of your choice on your operating system.
I use the Hack font which I install using Homebrew :
# install 'hack' font using Homebrew
brew tap homebrew/cask-fonts
brew install --cask font-hack-nerd-font
You can change your font to the one you just installed by updating your item2 preferences.
3. Customising the prompt (Starship)
The default theme for oh-my-zsh is called robbyrussell – named after the creator of oh-my-zsh.
I really like this theme’s minimalistic aesthetic and I used it for a long time before migrating to Starship.
While it is only the default theme, it is already a great upgrade on the featureless monochrome default zsh prompt.

There are a number of other themes that come with oh-my-zsh. A full list can be found in the GitHub Wiki
. In order to change the theme to one of the inbuilt themes, you just need to update the ZSH_THEME value in your ~/.zshrc and restart your terminal for the changes to take effect.
Alternatively, there are external themes that you can install and use instead of an inbuilt theme.
Powerlevel10K is a popular choice, however, I prefer to use Starship .
Starship is a highly customisable prompt that is compatible across shells – you can use the same prompt config for no matter if you are using bash, zsh, fish or Powershell as your shell.
Starship comes with sensible defaults, can be configured with a user friendly toml file and comes with a CLI tool that makes updating your prompt on the fly a breeze (more on that later…).
To install Starship you can follow the instructions on the documentation homepage .
# install starship
brew install starship
Then add the following line to the end of your ~/.zshrc to use the Starship prompt in zsh.
# ~/.zshrc

eval "$(starship init zsh)"
Restart your terminal for the changes to take effect.
Configuring Starship Prompt
Full documentation for configuring Starship can be found on their website .
The Starship prompt configuration is controlled using a file in your .config directory called starship.toml
For example, below is a simple configuration I use to show the Python version and virtual environment in the prompt when I navigate to a Python project directory:
# example ~/.config/starship.toml

add_newline = false

[python]
format = 'via [${symbol}${pyenv_prefix}(${version} )(\($virtualenv\) )]($style)'

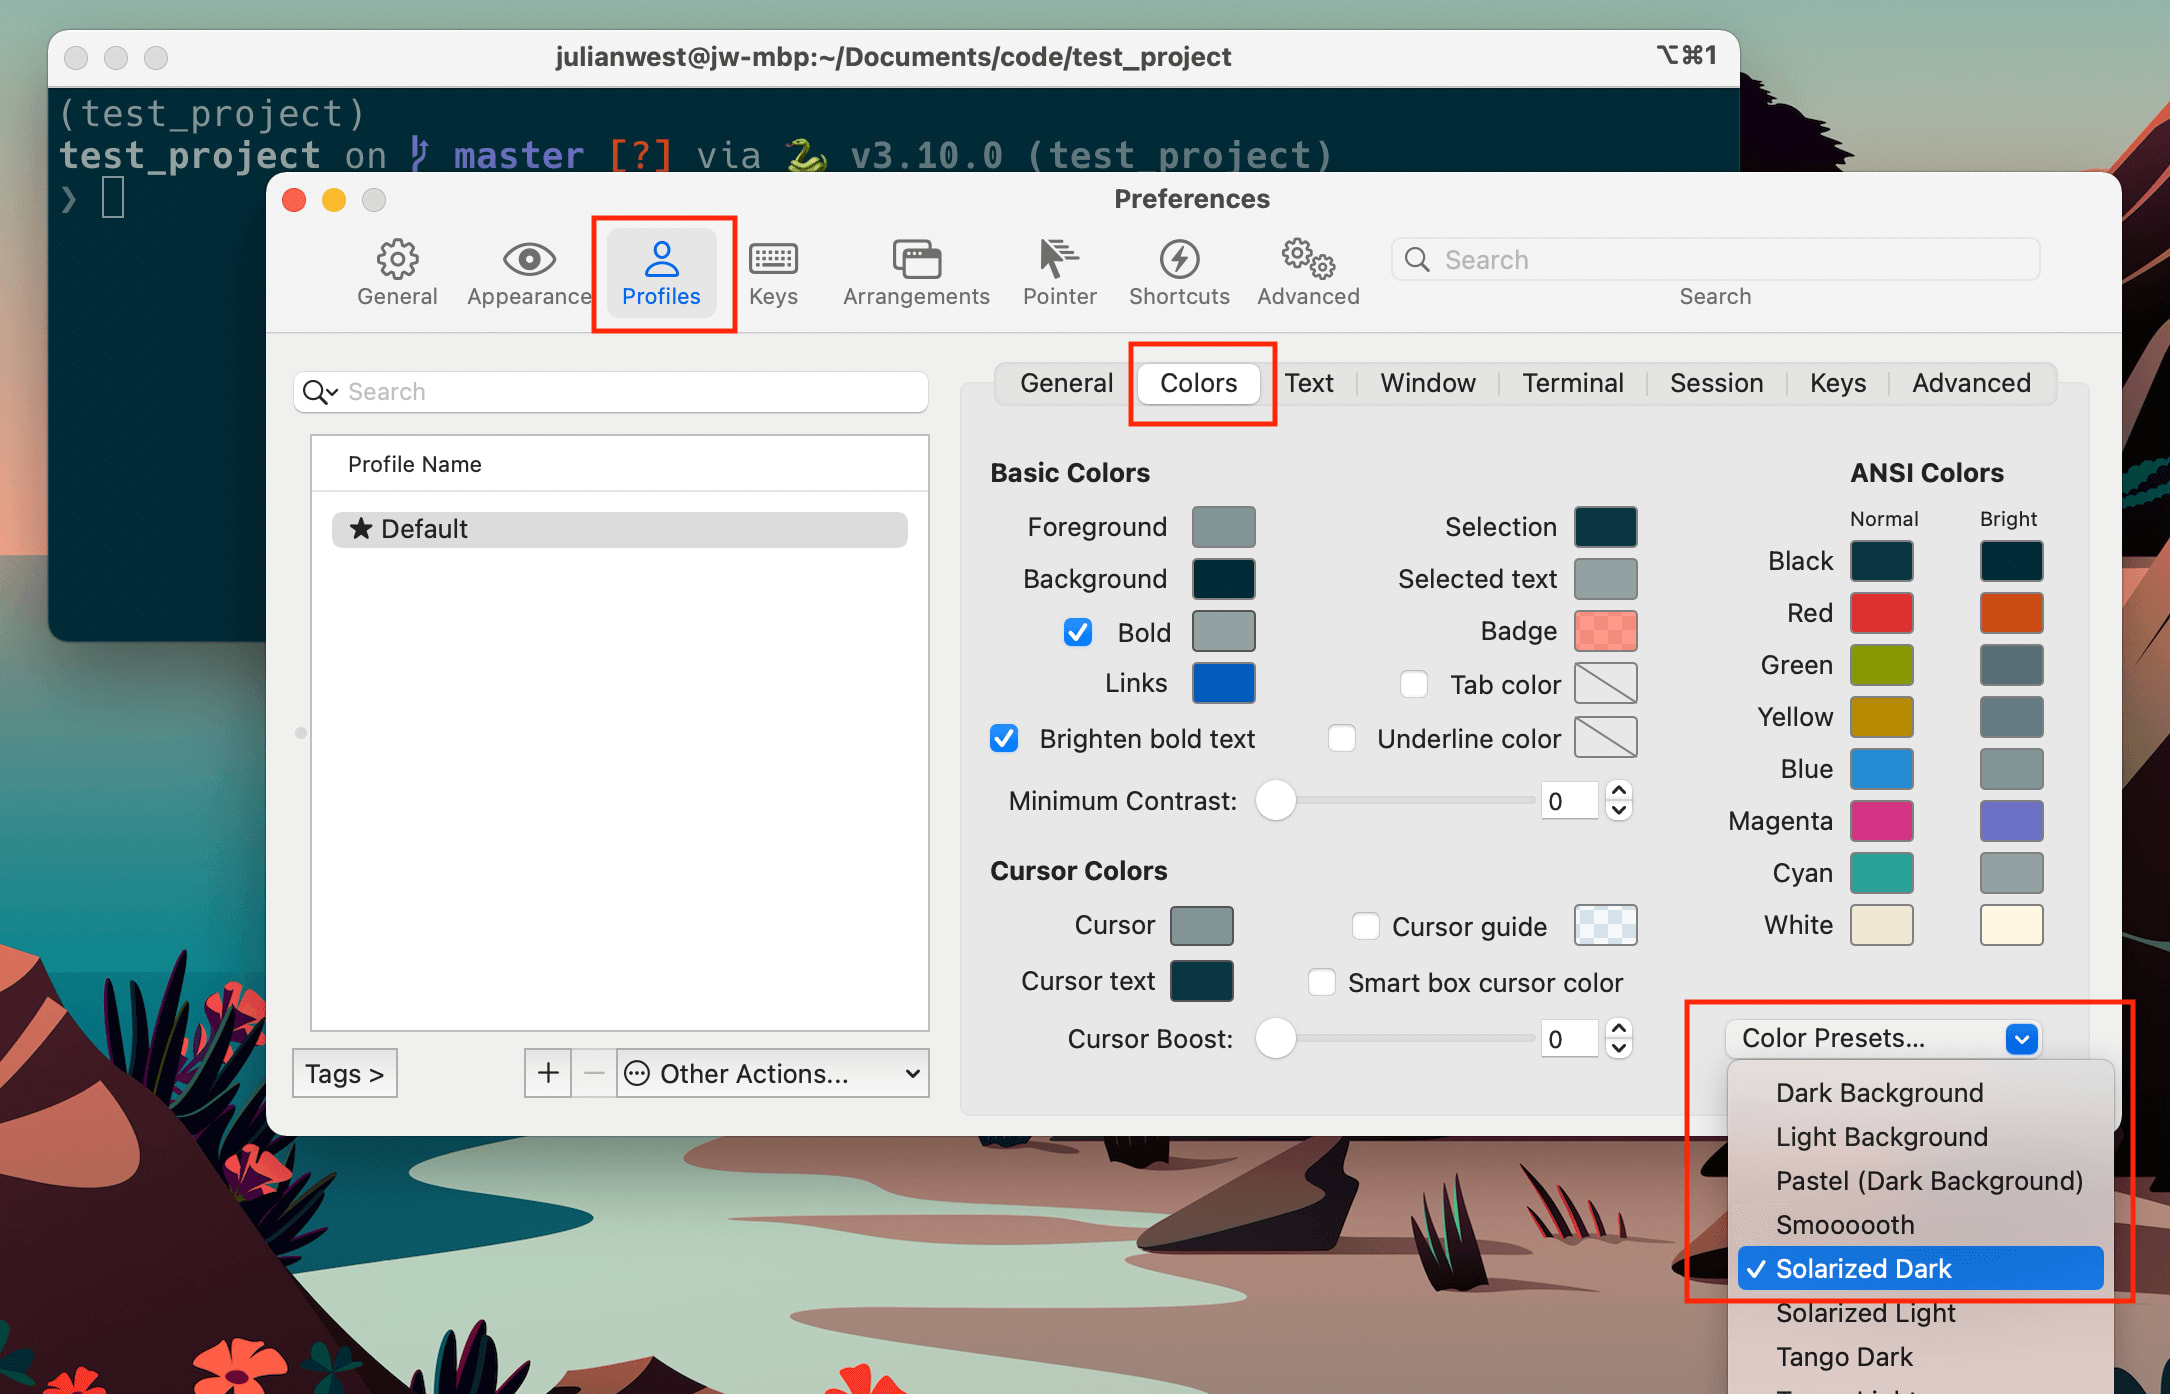
4. Choose a terminal colour scheme
Ok, so this part doesn’t really affect your ‘productivity’, but it is important to get the best looking terminal that you love coming back to 🎨.
This is completely down to personal preference – you might completely disagree with my choice – but I like using the Solarized Dark colour scheme. I also add some transparency/blur to the background.
There are many other preset colour schemes available and I recommend you play around to find your favourite.
These settings can be changed in the preferences GUI of iterm2.

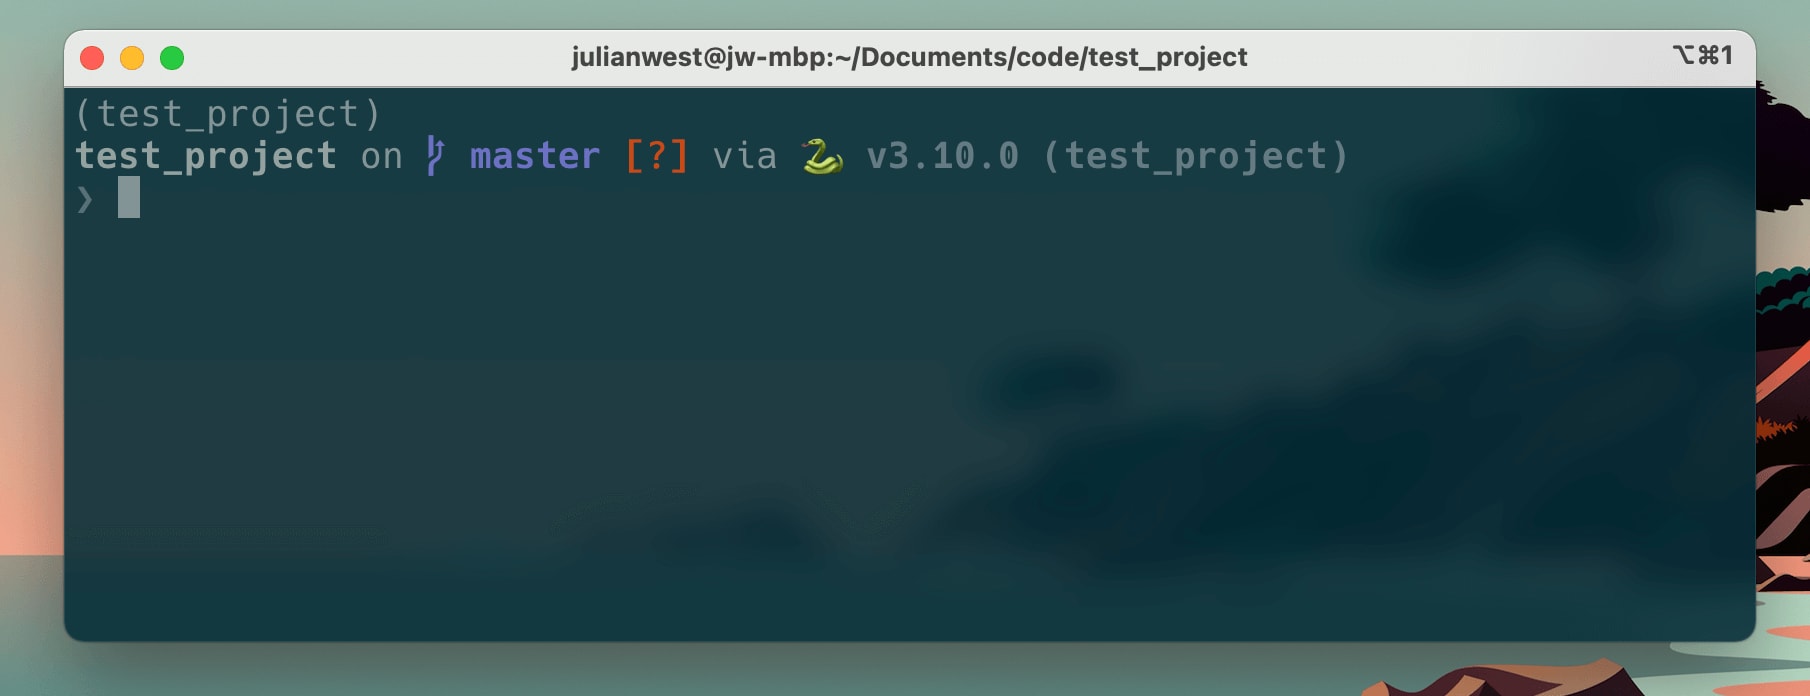
My final prompt using Starship and Solarized Dark colour scheme.
Essential Tools: Best oh-my-zsh plugins
5. Syntax highlighting
Syntax highlighting is critical for improving the usability of the terminal.
It helps you identify if you have a program installed correctly and can alert you to a misspelling or invalid command.
To enable syntax highlighting in zsh you need to install a plugin called zsh-syntax-highlighting
.
Installation instructions are provided in the GitHub repo
. You can install zsh-syntax highlighting using the following command:
# download syntax highlighting extension
git clone https://github.com/zsh-users/zsh-syntax-highlighting.git ${ZSH_CUSTOM:-~/.oh-my-zsh/custom}/plugins/zsh-syntax-highlighting
Then activate the plugin by updating the .zshrc file.
# add syntax highlighting to the list of plugins in your ~/.zshrc file
plugins=(zsh-syntax-highlighting)
Run source ~/.zshrc or restart your terminal for the changes to take effect.
Now when you type a keyword command it will turn green if it is correct or red if it is incorrect.

6. Auto-completion
Auto-completion saves a lot of time when typing long commands and is very helpful for remembering commands you have previously run.
The zsh-autosuggestions
plugin is required to enable autocompletions in zsh.
Installation instructions are provided on the installation wiki page of the GitHub repo. The installation is very similar to the syntax highlighting.
# install autocompletions extension
git clone https://github.com/zsh-users/zsh-autosuggestions ${ZSH_CUSTOM:-~/.oh-my-zsh/custom}/plugins/zsh-autosuggestions
# update plugins in your ~/.zshrc file
plugins=(
    zsh-syntax-highlighting
    zsh-autosuggestions
)
Restart you terminal or run source ~/.zshrc to see the changes.
7. Fuzzy file finding (FZF )
FZF is a fuzzy file finder that enables you to search for files interactively from the command line. It is really useful for quickly finding files when you know the name but can’t remember exactly where you saved it.
# install FZF (say yes to each option during installation)
git clone --depth 1 https://github.com/junegunn/fzf.git ~/.fzf
~/.fzf/install
The installation script will automatically update your .zshrc with the following line:
[ -f ~/.fzf.zsh ] && source ~/.fzf.zsh
Additionally, to get fzf to play nice with oh-my-zsh you will need to add fzf to your list of plugins and set an environment variable with the fzf installation location:
# update your ~/.zshrc file
FZF_BASE="$HOME/.fzf"

plugins=(
    zsh-syntax-highlighting
    zsh-autosuggestions
    fzf
)
You can now activate the fuzzy finder by either typing fzf as a command to your terminal or pressing CTRL+T. You can also trigger the fuzzy finder using the ** prefix and pressing <TAB> (see documentation
). For example:
# search which file to open in vim using the fuzzy finder
vim **<TAB>
FZF is highly customisable. I won’t go into too much detail here on how to configure it – it probably requires an entire blog post in itself. But there are plenty of great tutorials online explaining how to configure FZF which I recommend you investigate to get the most out of it.

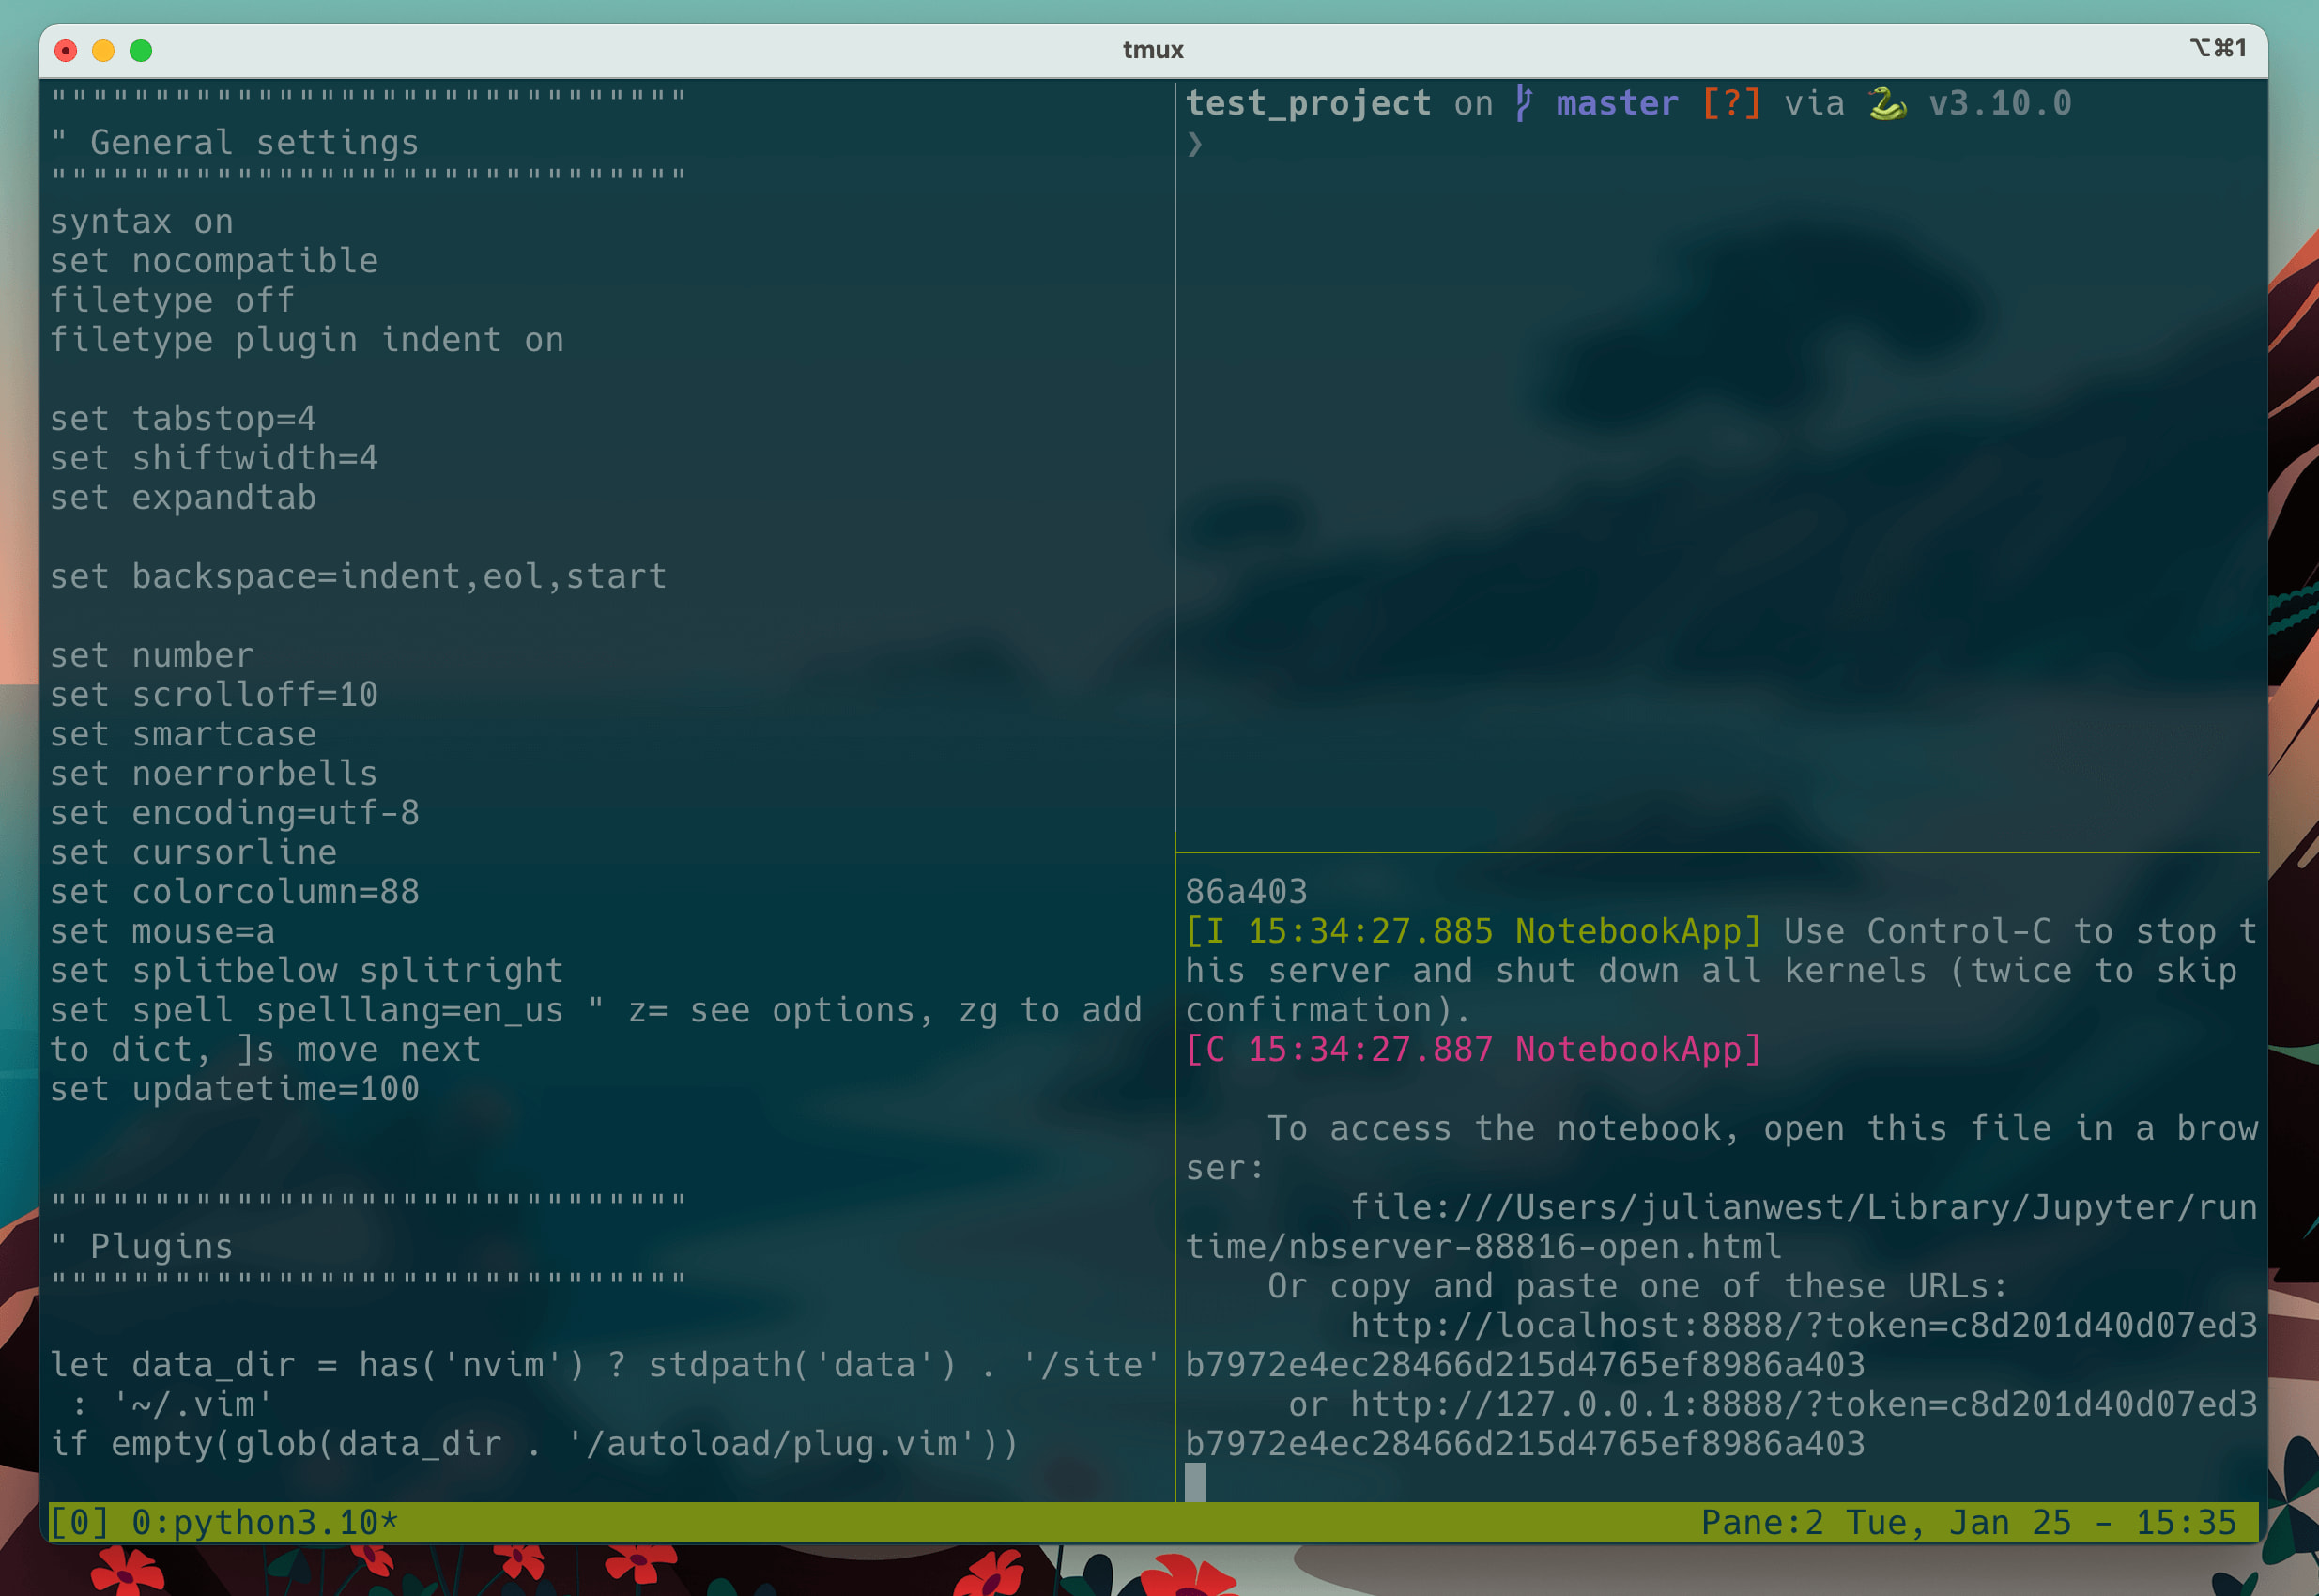
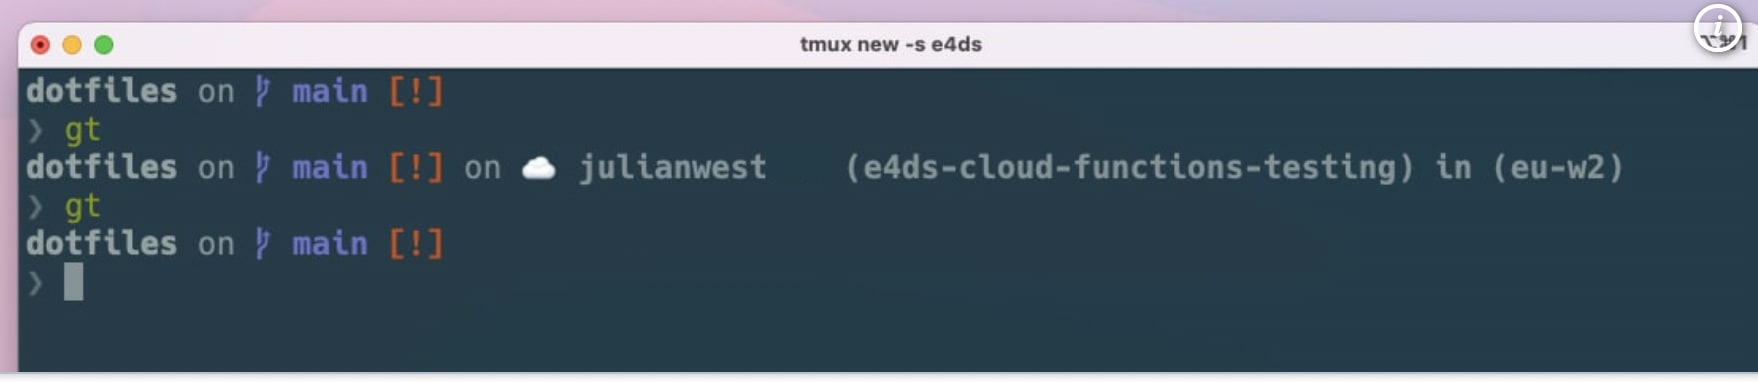
8. Window & session management (tmux)
It is common to have multiple terminal processes running at the same time.
A use case that immediately comes to mind as a data scientist is needing to run a Jupyter notebook server from the terminal, but also needing access to the terminal for other tasks like making git commits and running other python scripts.
Without the ability to open multiple windows or terminal sessions at once, your terminal will be blocked by the long running process.
The remedy for this problem is using a window management tool to manage multiple windows and terminal sessions at the same time.
iterm2 has an inbuilt ability to have multiple tabs open for different sessions. However, I love to use tmux instead as it is very customisable, powerful and works across multiple different terminal emulators so I can use the same keybindings no matter which terminal I am using.
Tmux can be installed via Homebrew:
brew install tmux
Again, you could write a whole blog post about configuring tmux. For this post, I’ll just provide a screenshot of an example tmux session and strongly encourage you look into a session/window management solution for managing multiple terminal sessions, whether that be using iterm2 tabs or tmux.
👨🎓 There is a great crash course for learning tmux by Chris Toomey on thoughtbot to get you up and running quickly.
Extras: Useful plugins and command line tools
The following programs are some additional zsh plugins and command line tools that I also find useful. Your own mileage may vary depending on your preferred workflow and use case.
z – a directory jumping tool
zsh-z is a command line tool that allows you to quickly jump between directories you have most recently visited.
One of the pain points of using the terminal is navigating through directories which can be trickier than navigating using a familiar file explorer GUI. Tools like z (and FZF described earlier) can make traversing your file system a breeze.
To install zsh-z we can clone the GitHub repository and add zsh-z to our list of plugins in the .zshrc file as before:
# download the plugin then update your ~/.zshrc file
git clone https://github.com/agkozak/zsh-z $ZSH_CUSTOM/plugins/zsh-z

bat – a better alternative to cat
When you want to quickly see the contents of a file in a terminal without actually opening it (e.g. showing a configuration file) you can use the inbuilt cat command.
However, the output on the command line is just plain text which can be difficult to scan read, especially if you are used to nice syntax highlighting in IDEs and code editors.
bat is an alternative to cat which supports syntax-highlighting among other functions and also integrates with other tools like fzf.
You can install bat using Homebrew (full instructions for other operating systems available on their GitHub documentation page
):
# install bat from Homebrew
brew install bat
You can use bat in the same way as you would use cat: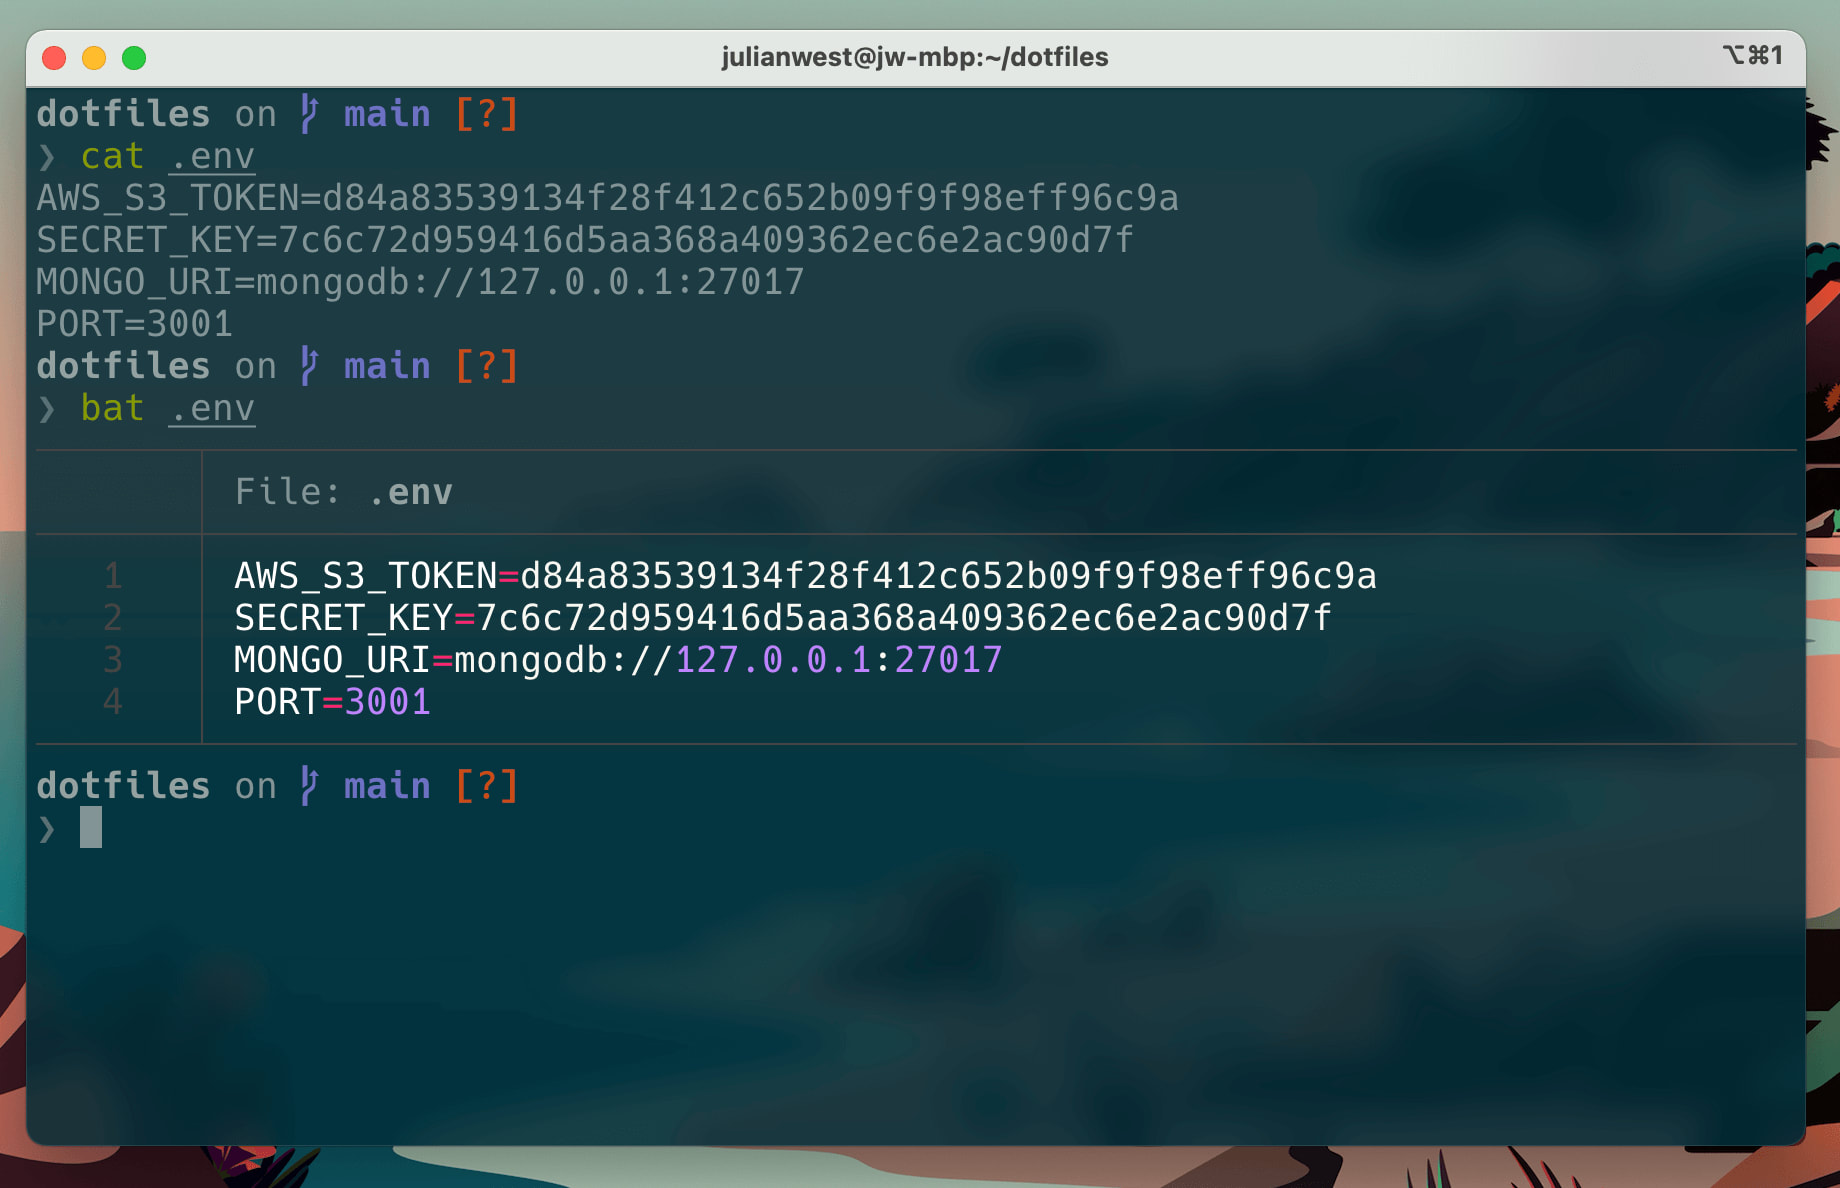
You can also integrate it with fzf to show a preview of each file complete with syntax highlighting while searching files: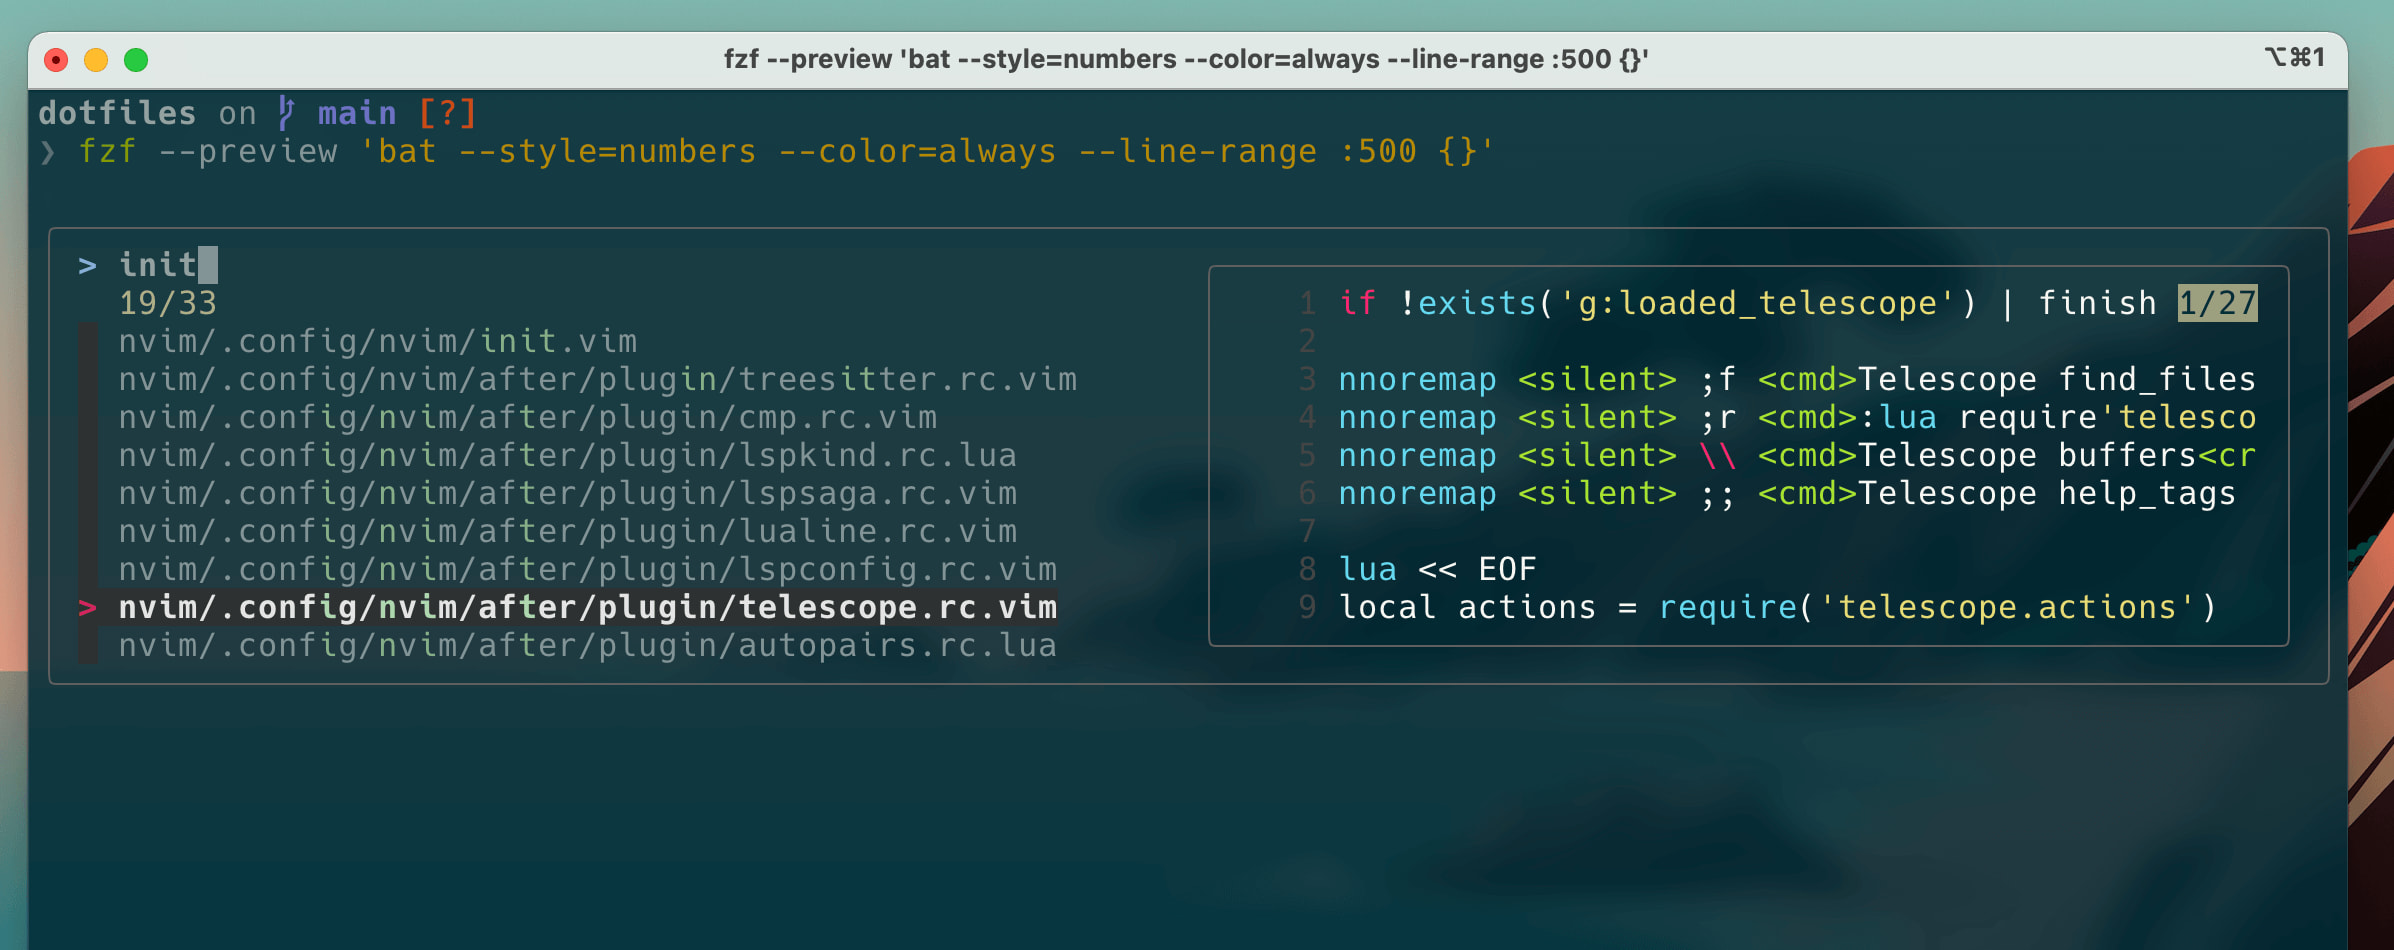
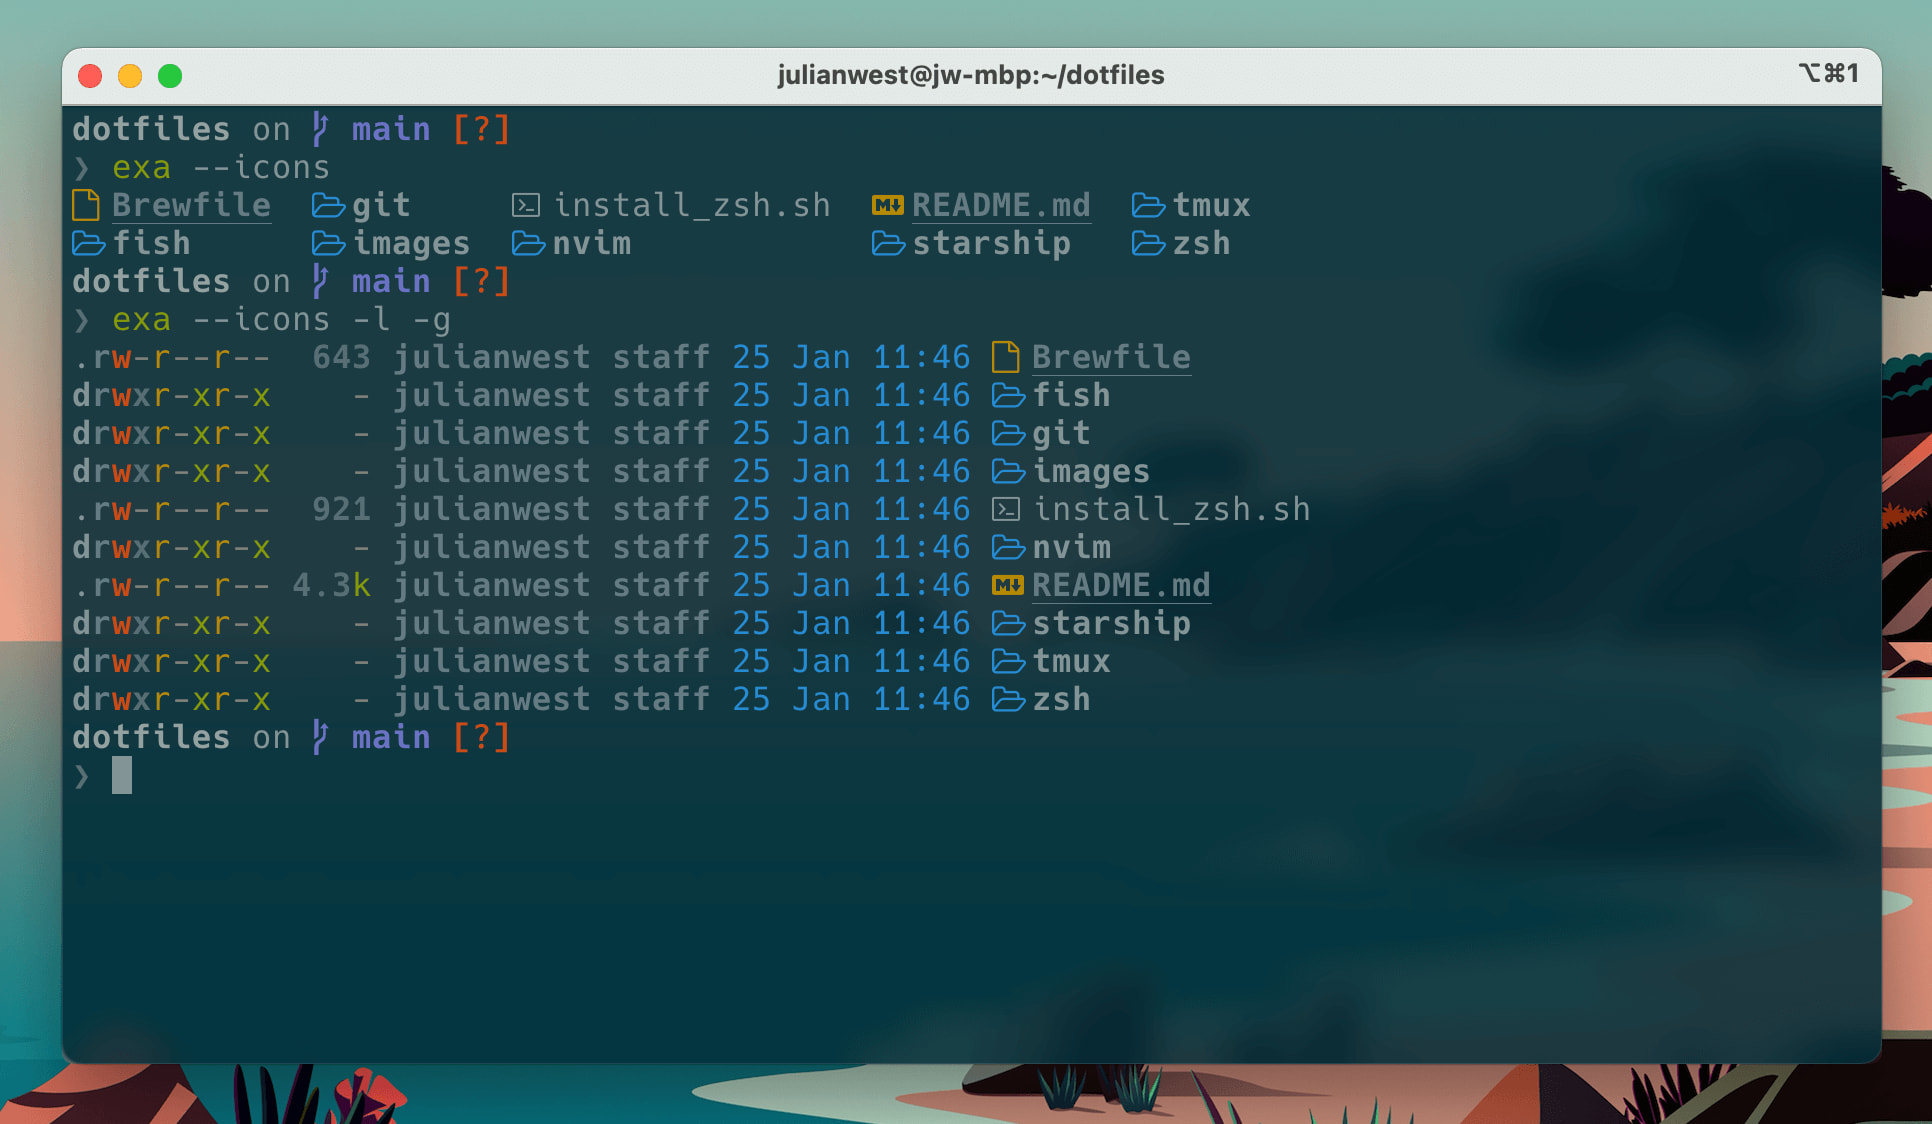
exa – a modern replacement to ls
In a similar vein, exa is a command line tool to replace ls.
The output of ls can be difficult to scan as there is no visual differentiation between files and file information. Everything is listed in the same colour.
exa is a more aesthetic file ‘lister’ with colour coding and support for icons which can make it much easier to understand the output.
Installation instructions are on the exa website .
# install exa
brew install exa
To use exa to list out files in a directory you can use the exa keyword followed by some arguments (see documentation
). I really like the support for file icons which makes it easy to identify each file type.
💡Top tip: Create an alias in your
~/.zshrcfile to mapexa --iconstolsso you don’t need to relearn any syntax
Personal Touches: Aliases
Another big time saver is creating aliases for long commands that you use frequently.
You can specify aliases in your .zshrc file.
Aliases will be personal to you and your workflows. I don’t use that many but here are the ones I like to use:
# ~/.zshrc

# python
alias python=python3

# git
alias gs="git status"

# map exa commands to normal ls commands
alias ll="exa -l -g --icons"
alias ls="exa --icons"
alias lt="exa --tree --icons -a -I '.git|__pycache__|.mypy_cache|.ipynb_checkpoints'"

# show file previews for fzf using bat
alias fp="fzf --preview 'bat --style=numbers --color=always --line-range :500 {}'"

# starship prompt
alias gt="starship toggle gcloud disabled" # toggle gcloud info on the prompt
I work a lot with Google Cloud to deploy machine learning pipelines and models. When using the glcoud command line tool I get paranoid about accidentally deploying infrastructure in the wrong region (#GDPR) or even to the wrong client project. Starship allows you to ‘toggle’ the prompt settings using their CLI tool. I have created an alias, gt, which toggles important information about my current gcloud profile. This is great as I don’t need it all the time, but being able to change my prompt on the fly is really useful!
Conclusion
For the uninitiated, the terminal can be unforgiving, stressful and annoying to use. Default settings have an appalling UX. Enough for some developers to retreat to the cosy embrace of a familiar GUI tool and never return.
However, a couple of hours invested in configuring your terminal will pay huge dividends for your productivity, workflow and overall programming effectiveness.
Oh-my-zsh is a great framework for managing your zsh shell configuration and plugins. By installing three or four key plugins and adding a few lines to the .zshrc file you can transform your experience when using the command line and boost productivity.
Happy coding!
Resources
A full list of
oh-my-zshplugins is available on the zsh GitHub wiki page
Full .zshrc file created from this tutorial
Basic starship.toml configuration file from this tutorial
Further Reading
- Data Science Setup on MacOS (Homebrew, pyenv, VSCode, Docker)
- Five Tips to Elevate the Readability of your Python Code
- Automate your MacBook Development Environment Setup with Brewfile
- SQL-like Window Functions in Pandas
- Gitmoji: Add Emojis to Your Git Commit Messages!
- Do Programmers Need to be able to Type Fast?
- How to Manage Multiple Git Accounts on the Same Machine