Introduction
Data lakes provide an excellent location for centralised, scalable storage of raw structured and unstructured data. However, there is no requirement for raw data to adhere to any predefined schema or quality controls before being uploaded to the data lake.
Without testing and governance, data lakes can quickly become data swamps. This makes it difficult for end-users to navigate through the chaos to find useable data without spending hours cleaning it up themselves.
Monitoring data quality should happen as early as possible in the data ingestion process. Ideally, as soon as data lands in the data lake.
In this article, we will look at how to build a serverless, automated data validation process – using a Python library called Great Expectations and Google Cloud Functions – that is executed any time new data is loaded into a data lake on Google Cloud Platform.
Data Quality Considerations
Typically the first data check data engineers will verify is the data types of the input.
This is to ensure the data formats match an expected data schema definition – after all, that’s all that is required to load into a data warehouse, right?!
Data type checking is indeed important. However, it doesn’t tell you much about the quality of the data.
Data quality doesn’t only cover technical details like data types. It also includes additional factors that would adversely affect downstream analysis should they be allow to propagate through the pipelines.
For example, other data considerations include:
- missing data – how much missing data is acceptable?
- data ranges – such as negative numbers for quantities that should only have positive numbers
- outliers – are some datapoints unreasonably high or low compared to an expected range?
- business logic – should certain columns only contain values in a predefined list?
It is extremely important for data engineers to be aware of the end use cases for the data in their pipelines.
Just because a dataset loads successfully into the data warehouse does not necessarily mean it is appropriate for the downstream processing tasks
Great Expectations
Data quality checks could be hardcoded into the pipeline source code. For example, using a series of if/else statements and assertions. However, this can be cumbersome to write, particularly for complex data tests.
Luckily, there are many tools out there available for testing data quality. These include Tensorflow Data Validation, Pandas Profiling, dbt Tests among others.
The focus of this post, however, will be a Python library called Great Expectations .
In a nutshell, Great Expectations allows you to write unit tests for your data.
Some of the main benefits of using Great Expectations over manual data checks in your code include:
- tolerances – easily specify a tolerance for each data test. This allows some flexibility in the input data
- data checks ‘out of the box’ – don’t waste time writing your own code for checks when you can utilise Great Expectations extensive catalog
- table level and column level checks – write tests against the entire table (e.g. expected number of rows, columns etc.) as well as individual columns
- advanced data checks – Great Expectations allows you to define advanced data checks such as data distributions, expected quantile ranges
- user interface – one of the biggest selling points is the user interface which visualises the results of each data validation check. This makes it extremely easy to identify issues and which data values are responsible
Let’s try it out.
Using Great Expectations for event-driven data testing on GCP
GCP Solution Architecture
Solution Requirements
When designing a solution to a problem it is important to keep track of the requirements.
For this particular tutorial scenario I assume the following requirements/constraints:
- Validation on entry – data should be validated as soon as it is uploaded into GCS
- Serverless – the data validation processing should happen using serverless products in order to avoid overhead of managing infrastructure
- Data docs UI – validation results of each file landing in the GCS bucket should be recorded and viewable by colleagues in the Great Expectations user interface. This is to help with debugging bad datasets to identify which data rows/values are causing the issues.
- Configuration driven – multiple different datasets with different schema land in the bucket. Configurations for Great Expectations should be read at runtime and adapt to the relevant dataset depending on the name of the file. Updates to configurations should happen without requiring code changes to the underlying Cloud Function
Data Considerations
- Relatively low volume – maybe a few thousand files per day
- Relatively small file sizes – data from each file can fit in memory of a Cloud Function
Note for a different set of requirements or data size/velocity, the best solution may be different to the one described in this post.
Architecture
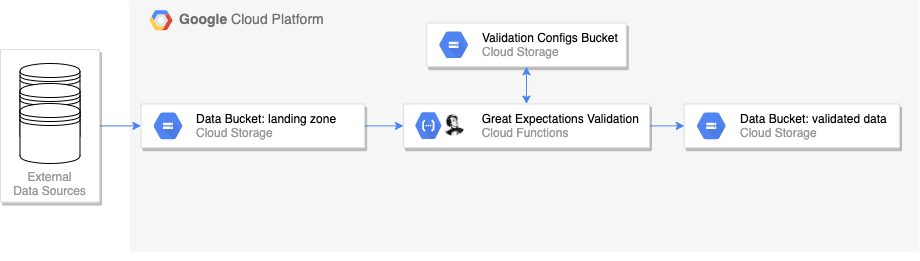
The diagram above shows the high level architecture diagram for event driven testing on GCP using Great Expectations and Google Cloud Functions.
The workflow can be summarised as:
- data lands in a Google Cloud Storage (GCS) bucket
- this triggers a Google Cloud Function with runs a suite of tests against the data using the Great Expectations library
- the Cloud Function reads from a set of configuration files at runtime, stored in a separate ‘validation’ bucket. The configuration files determine which data tests should be run and where the results should be stored
- if the data passes its validation, it is moved (renamed) to another folder in the ‘data’ bucket called ‘validated’. If the data fails, the data is not moved
- Once data has been validated, it can be passed on for downstream processing tasks. For example, another Cloud Function could be triggered after validation to import the data into BigQuery.
In a real world use case you might want to name your folders differently rather than simply using ‘validated’, for example partitioning by date. This example is only to demonstrate the point of separating ‘good’ data from ‘bad’ as soon as it enters the bucket.
Benefits
Some benefits of this architecture include:
- serverless – purely event-driven and no need to manage infrastructure for compute or orchestration
- dynamic – Great Expectations configuration files are read at runtime. Therefore, you can support multiple different datasets from the same Cloud Function without having to modify the code. By the same note, if you want to change the expectations which are run against the data in the future you simply update the config files instead of changing and redeploying the Cloud Function
- data docs – the Great Expectations data docs generated by each run are stored in the ‘validation’ GCS bucket which can be accessed and shared with your colleagues. The user interface greatly aids debugging and identification of the problematic data values
Alternative Approaches
This article follows an approach which meets the above stated requirements. Your own mileage might vary depending on your own requirements.
There are alternative – potentially more straightforward – ways to achieve event-driven testing with Great Expectations and Google Cloud Functions.
While researching this tutorial I came across a brilliant article by Anna Geller called Put a Stop to Data Swamps With Event-Driven Data Testing . Anna’s example uses an AWS tech stack (S3 buckets and AWS Lambda) which is analogous to Google Cloud Storage and Google Cloud Functions and is therefore easily transferable to Google Cloud Platform.
Anna’s article explains a ‘Pythonic’ method for writing tests for a data source without any config files. However, for my particular use case, I really wanted a method for generating data docs and supporting multiple different datasets/schemas without having to modify the Cloud Functions code itself or deploy multiple different cloud functions for each dataset. So I came up with a different solution.
Prerequisites
If you want to follow along or implement your own solution, the following is required:
A GCP project with billing enabled
- This tutorial easily falls under the free tier for Google Cloud Functions and Google Cloud Storage usage and will not cost any money. However, billing still needs to be enabled on the project.
- If you don’t already have a Google Account. Sign up at Google Cloud and get $300 in credit
The gcloud sdk installed and terminal session authenticated
- Here is a good article explaining how to setup and authenticate your terminal session using the gcloud sdk
The following Google Cloud API’s activated for your project
- Cloud Storage API
- Cloud Functions API
- Cloud Build API
Two buckets created in Google Cloud Storage
- A ‘data’ bucket for storing the incoming data in the landing zone, and a ‘validation’ bucket for storing the configuration files which will define which tests to run against the data
- Buckets can be created manually in the UI, or via the command line using the gcloud sdk . For example:
# bash: scripts/create_resources.sh

# set variables
PROJECT=<your-gcp-project>
REGION=<your-chosen-region>

# create bucket for storing data
gsutil mb -c standard -p $PROJECT -l $REGION gs://${PROJECT}-${REGION}-data

# create bucket for storing validation configuration files
gsutil mb -c standard -p $PROJECT -l $REGION gs://${PROJECT}-${REGION}-validation-configs
Project Directory Structure
💻 All code described in this post is available in this GitHub repo
The directory structure for the project is as follows:
├── cloud_functions                <- directory for storing cloud functions
│   └── data_validation            <- data validation cloud function
│       ├── env.yaml               <- cloud function environment variables
│       ├── main.py                <- cloud function entry point
│       ├── requirements.txt       <- requirements for cloud function
│       └── src
│           └── gcs.py             <- utility functions for interacting with Cloud Storage
├── data                           <- directory for storing the example dataset
├── data_generator                 <- scripts for creating demo datasets
├── great_expectations
│   ├── expectations               <- data expectations definitions
│   │   └── properties.json
│   ├── great_expectations.yml     <- Great Expectations config
│   ├── loading_args               <- configurations to specify arguments for loading data into Great Expectations dataframe
│   │   └── properties.yml
│   └── uncommitted
│       └── edit_properties.ipynb  <- example notebook for defining data expectations
├── requirements.txt
└── scripts                        <- bash scripts for deploying cloud function and moving configs to GCS
The most important directories are cloud_functions – where the cloud function code is stored – and great_expectations which is where we will create our data expectations and configuration files.
There are three other directories: data, data_generator and scripts. This is where will store the example dataset, scripts for generating the example dataset and general bash scripts for automating our interactions with Google Cloud Platform respectively.
Example Dataset
To test Great Expectations, we need an example dataset. For this demo, I created a fake ‘properties’ dataset using the Faker library .
The dataset contains various information about properties such as the address, number of rooms, price etc. A snippet is shown below.
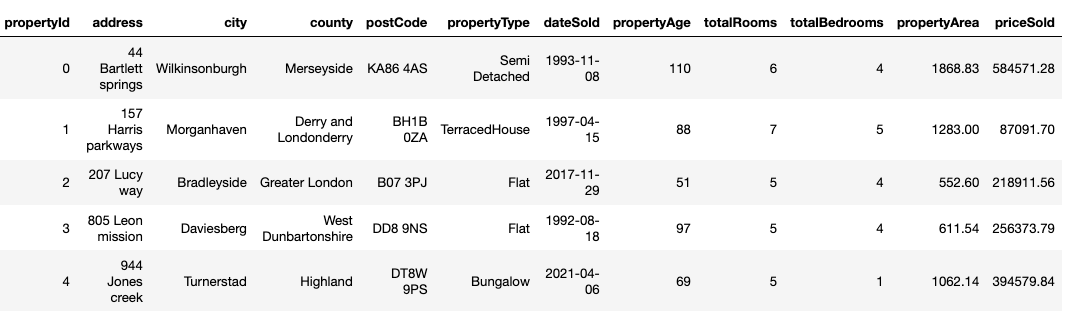
The structure and content of the dataset itself is not really important as the code from this tutorial can translate to any other tabular dataset.
But for those interested, the code I used for generating the dataset is available in the data_generator/data_generator.py file. I have also provided the raw data produced by the data generator in the data directory of the repo.
Two versions of the data were created for the demo. A ‘clean’ version that we expect to pass our data validation tests and a ‘bad’ version which contains a number of data quality errors such as invalid data types, negative numbers and outliers – Great Expectations will help us identify these issues later!
Great Expectations Configurations Setup
The first step in this setup is to create and configure Great Expectations for our chosen dataset. We will deal with the Cloud Functions code itself later.
The standard deployment specified in the Great Expectations Getting Started Tutorial relies on two components:
- The Great Expectations CLI to initialise a data context, create a set of expectations and define the datasources
- The
great_expectations.ymlfile to manage the project configuration
The Getting Started Tutorial assumes you have your datasources stored locally (on the same machine as the one running the Great Expectations validation) and the great_expectations.yml file is also co-located with the data on the same machine.
However, we run into a few issues when using a serverless architecture:.
- We don’t have CLI access to the machine the Cloud Function runs on. So we can’t use the CLI directly on the host machine to initialise a Great Expectations project and run through the suggested workflow
- We can’t (or don’t want to) store the
great_expectations.ymland other configurations in the Cloud Functions code/file system itself - We want to read data from Google Cloud Storage, not our local machine
So how do we get around this?
First, we initialise the Great Expectations project on our local development computer using the suggested workflow, but then copy the configurations files to GCS where they can be read independently by the Cloud Function at runtime.
In the great_expectations.yml file we can configure Google Cloud Storage as a remote source for our data but also as a place to store the data expectations (test suite), validation results and the data docs.
Additionally, we can use Great Expectations' RuntimeBatchRequest functionality to dynamically read data and configurations from the remote storage bucket. This allows us to add logic to the Cloud Functions code to dynamically change the Great Expectations configuration depending on various runtime variables. More on that later .
Expectations
Great Expectations allows you to define ‘expectations’ for your data interactively using the CLI and Jupyter notebooks. Expectations are essentially unit tests for your data.
The Great Expectations project can be initialised on your local machine using the CLI.
great_expectations --v3-api init
This will create the great_expectations folder which we will use to initially create and store expectations and configuration files. You can read more about the great_expectations directory structure in the documentation
.
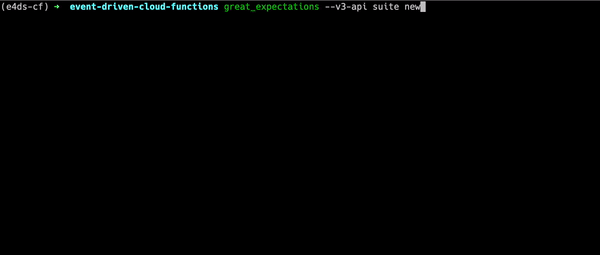
Next, we can create an expectations suite for the data using the interactive Jupyter notebook environment.
great_expectations --v3-api suite new
Running the command opens an interactive prompt. Initially you should select option 1 which indicates you want to create your expectations manually. We select this as we have yet to configure the remote datasource in the great_expectations.yml file and Great Expectations will not be able to find your data in GCS just yet.
After completing the prompt questions, a Jupyter notebook will automatically start which can allow you to create expectations in an interactive fashion.
In the notebook you can interactively define expectations for your data as a whole and for each column independently. I have included in the repo an example notebook which you can use as a template for defining expectations (without access to the underlying dataset).
Where the Great Expectations library really shines is the vast amount of advanced data tests available ‘out-of-the-box’. For example, regex checks , min-max values , expected values , expected quantiles etc. which can all be added to your testing suite without having to implement them yourself which would be cumbersome and prone to errors. A full list of available tests are provided in the Expectations Catalog
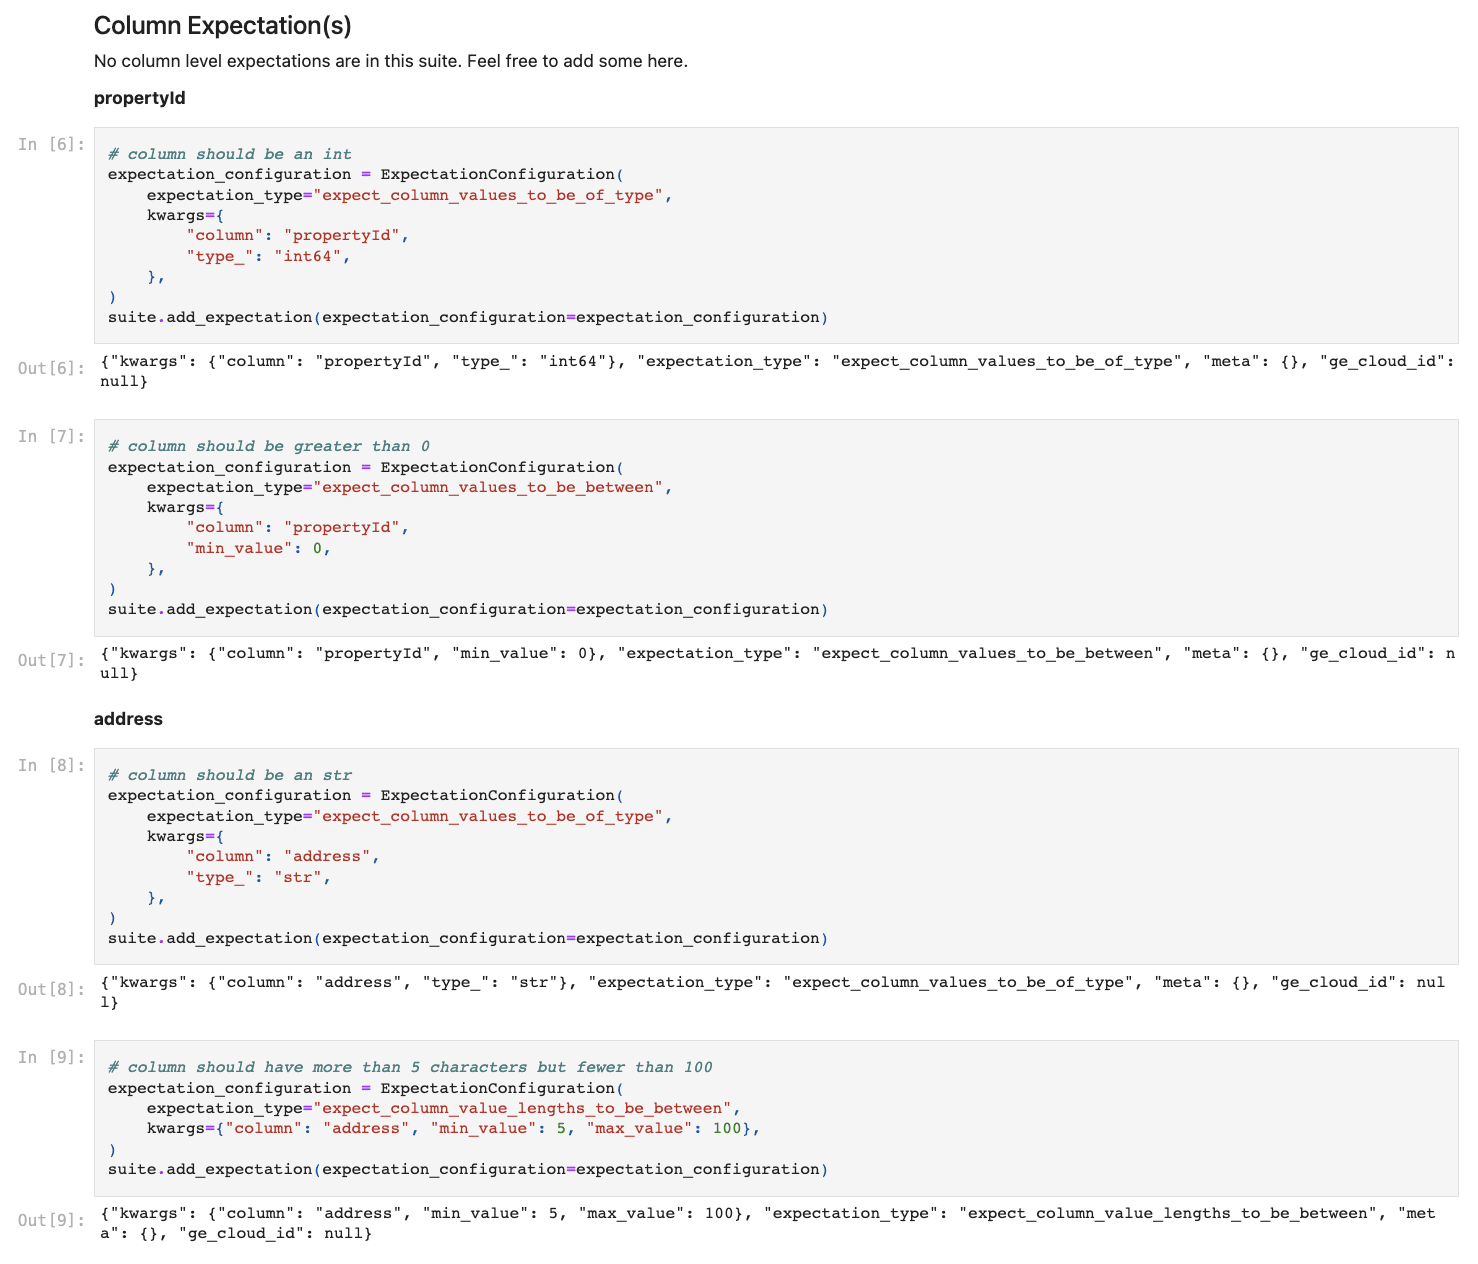
After defining the expectations for our data in the notebook, we can save the expectations in JSON format into the great_expectations/expectations folder. See here for the example
JSON generated from the notebook.
Loading Args
When running the validations on the data, Great Expectations will load the dataset into an in memory Pandas dataframe before running its magic.
As you will know if you have loaded data using Pandas, you typically need to pass some arguments to the loading function to correct load the data. For example, when reading a csv file using pd.read_csv you might want to rename columns, specify if there is a header row or not, specify dtypes etc.
We will need to pass these loading arguments to Great Expectations at runtime in order to load the data correctly into the Pandas dataframe.
To do this we can create a new folder called great_expectations/loading_args to store a yaml configuration file which defines the loading arguments. See the GitHub repo
for a simple example. This file may not be required if your data does not require any specific loading arguments.
We will copy this configuration to GCS later so it can be read at runtime by the Cloud Function.
great_expectations.yml
The great_expectations.yml file is used by Great Expectations to define and configure the location of the target data as well as were to find and store other important artifacts such as the expectations, the validation results and data docs.
As specified in the architecture, we want to configure Great Expectations to read data at runtime from a GCS ‘data’ bucket but read expectations from a GCS ‘validation’ bucket and store the validation results and data doc artifacts in the ‘validation’ bucket as well.
Here is the great_expectations.yml file to make this happen.
Let’s break it down.
The first part defines the datasources. Basically, where should Great Expectations look to find the data.
Typically we might explicitly define the location of the data if we knew the name or folder location ahead of time. However, this is an event-driven system and we don’t know the name or location of the file we want to test until the Cloud Function is actually triggered.
Luckily, we don’t need to explicitly define the datasource in the great_expectations.yml file. We just specify our data connector is a RuntimeDataConnector which means we will pass the explicit data location at runtime using a dynamic variable.
Next we define our stores for our expectations and validations.
stores:
    expectations_GCS_store:
        class_name: ExpectationsStore
        store_backend:
            class_name: TupleGCSStoreBackend
            project: ${PROJECT}
            bucket: ${VALIDATION_BUCKET}
            prefix: 'expectations'

    validations_GCS_store:
        class_name: ValidationsStore
        store_backend:
            class_name: TupleGCSStoreBackend
            project: ${PROJECT}
            bucket: ${VALIDATION_BUCKET}
            prefix: 'validations'
In order to configure a store in GCS you can follow the instructions on the documentation page
. We need to specify the GCP project and bucket where the expectations JSON file will be stored. In the example above, we define that the expectations JSON is stored in the VALIDATION_BUCKET in a folder (prefix) called expectations. Additionally, we specify that Great Expectations should then store the validation results in a folder in the VALIDATION_BUCKET called validations.
You can replace ${PROJECT} and ${VALIDATION_BUCKET} placeholder variables with your own project and validation bucket name. However, rather than hard-coding these variables, I decided to use these placeholder variables in the YAML file and perform a string replacement during execution of the Cloud Function to replace the placeholders with their corresponding environment variable value.
The data docs are artifacts which allow you to render the validation results in a nice HTML user interface in the browser. The data_docs_sites parameter defines where these artifacts should be created and stored after running the validation.
data_docs_sites:
  gs_site:
    class_name: SiteBuilder
    store_backend:
      class_name: TupleGCSStoreBackend
      project: ${PROJECT}
      bucket: ${VALIDATION_BUCKET}
      prefix:
    site_index_builder:
      class_name: DefaultSiteIndexBuilder
The snippet above will save the data docs artifacts into the validation GCS bucket. We can access these later when we want to view the data docs.
Finally, we set the action list to define what steps Great Expectations should take when running the validation.
validation_operators:
  action_list_operator:
    class_name: ActionListValidationOperator
    action_list:
    - name: store_validation_result
      action:
        class_name: StoreValidationResultAction
    - name: store_evaluation_params
      action:
        class_name: StoreEvaluationParametersAction
    - name: update_data_docs
      action:
        class_name: UpdateDataDocsAction
The configuration snippet above will instruct Great Expectations to store the validations results after each run and then update the data docs artifacts automatically.
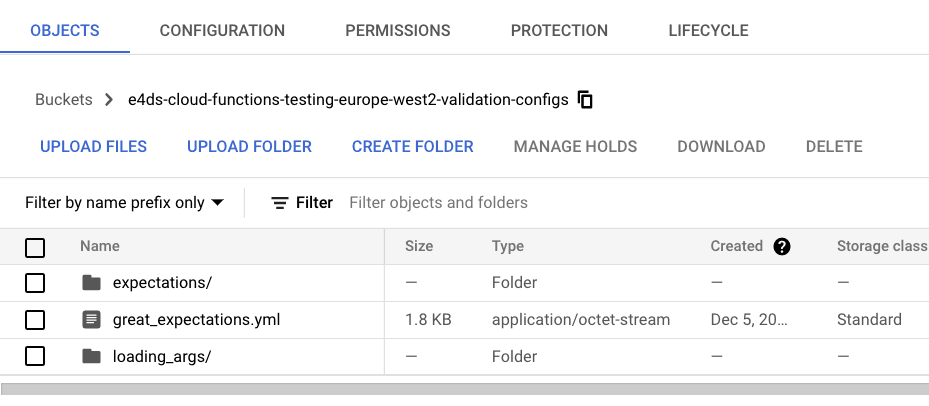
Copy Configurations to GCS
Once we have configured Great Expectations locally on our development machine, we need to copy these configuration files to the ‘validation’ GCS bucket.
I have included a utility script in the repo
to copy the contents of the great_expectations folder to the validation bucket in GCS.
# bash: scripts/move_configs_to_gcs.sh

# Sync the validation bucket configs with the configs stored locally in the great expectations
# folder. Ignore anything in the 'uncommitted' folder and the 'plugins' folder
gsutil -m rsync -r -x 'uncommitted/*|.gitignore|plugins/*' great_expectations gs://$VALIDATION_BUCKET
After running the script all the relevant configuration files for Great Expectations will now all be stored in GCS which can be accessed and read at runtime by the Cloud Function.
Cloud Functions Code
Now, we get to the Cloud Functions code itself.
You can see the full code in the cloud_functions/data_validation directory of the repo. But as a reminder, here is the structure of Cloud Functions directory:
data_validation
├── env.yaml                 <- environment variables
├── main.py                  <- cloud function entry point
├── requirements.txt         <- required libraries
└── src
    ├── __init__.py
    └── gcs.py               <- GCS utility functions
Cloud Functions require a specific directory structure and naming convention:
- the trigger function must be defined in the top level directory in a file called
main.py - the specific library dependencies for the function should be referenced in a
requirements.txtfile - any other files needed for the main function to run should be placed in a separate local package folder (e.g.
src) with an__init__.pyfile
More information can be found on the Cloud Functions documentation page .
I have also included an env.yaml file (not under source control) which contains the names of the PROJECT, BUCKET and VALIDATION_BUCKET. These will be passed as environment variables to the Cloud Function when we run the deployment script
.
If you are following along with the example repo
, you should create your own env.yaml file in the data_validation directory and populate it with the relevant project and bucket names. E.g.
# env.yaml
PROJECT: <your-project-name>
BUCKET: <your-data-bucket-name>
VALIDATION_BUCKET: <validation-bucket-name>
The Cloud Functions code is in the main.py file
:
There are a number of functions at the top of the file which are broken out of the main function to improve testability and modularity.
The key function to focus on – which builds the configuration and runs the validation – is called main (line 118). This is the function that will be triggered when the data file arrives in the data bucket.
Let’s break each step of this function down:
1. Check if the file which triggered the function is in the correct folder in the bucket
# check new data file is in the landing_zone 'folder', else skip validation
if not check_trigger_file_path(data["name"], "landing_zone"):
    return
- the Cloud Function will trigger every time a new file is added to the bucket or renamed within the bucket. We only want to complete the validation on files which are landing in the ‘landing_zone’ folder.
- this check uses a simple function called
check_trigger_file_pathin thesrcutilities folder which checks the file name (i.e. folder) starts with ‘landing_zone’ - if the file is not in the ‘landing_zone’ folder, the function exits without running the validation
- if we do not have this check, when we move the file to another folder location, the Cloud Function will be triggered again as it thinks a new file has been added to the bucket. However, it is just an existing file which has been moved (renamed)
Side Note
Google Cloud Function storage triggers can only be set at a bucket level rather than at the folder level. This means the Cloud Function will be triggered every time a new file is added to the bucket or renamed, regardless of whether it is in the target ‘landing_zone’ folder or not.
While not the most elegant, we can get around this by performing a file name check on the file (as shown above) and exiting the function if the file is not in the target folder.
The cost of Cloud Function invocations is pretty cheap so invoking Functions only to immediately exit should not be an issue. However, in very large scale systems, paying for unnecessary invocations can be costly. Another option would be to update the metadata of an object to signal it has been validated, rather than renaming it. Updating the metadata will not trigger this Cloud Function a second time as a new file has not been created.
However, for this demo I chose to rename the file as it is more visible to humans inspecting a bucket to understand which data has been validated. Metadata is less visible and can only really be accessed via API.
2. Read configuration files from GCS validation bucket
dataset_name = extract_dataset_name(data["name"])
data_uri = f"gs://{data['bucket']}/{data['name']}"
project_config = read_yml_from_gcs(
    bucket_name=VALIDATION_BUCKET,
    blob_name="great_expectations.yml",
    template=YAML_TEMPLATE,
)
batch_spec_passthrough = read_yml_from_gcs(
    bucket_name=VALIDATION_BUCKET,
    blob_name=f"loading_args/{dataset_name}.yml",
    template=YAML_TEMPLATE,
)
- we extract the dataset name from the name of the file which triggered the cloud function using a function from the
srcfolder. The expectations suite and loading args yaml files were saved using the nameproperties.ymlwhich corresponds to the dataset name. This allows us to handle multiple different datasets with the same cloud functions code. All we need to do is add an expectations suite and loading_args config which bears the name of the dataset name and the cloud function will dynamically read it. - then we read the project configuration (i.e.
great_expectations.yml) and the data loading args (batch_spec_passthrough) yaml files from their location in the validation bucket. - we also pass a
templateargument to this function which will replace the placeholder strings (i.e.${PROJECT}and${VALIDATION_BUCKET}) with their runtime values defined in the environment variables
3. Run the validation using Great Expectations
checkpoint_result = run_validation(
    dataset_name, data_uri, project_config, batch_spec_passthrough
)
- we pass the data file name and configuration parameters to a function which builds the Great Expectations context and runs the validation
- the
run_validationfunction uses aRuntimeBatchRequest(see line 57) to get the data from the data bucket - at this point, the validation results are automatically stored in the validation bucket and the data docs are updated – as configured in the
great_expectations.ymlfile earlier
4. Move (rename) the file if successful
if checkpoint_result["success"]:
    logger.info("Validation successful")
    move_blob(
        bucket_name=data["bucket"], blob_name=data["name"], prefix="validated"
    )
else:
    logger.error("Validation unsuccessful")
    raise ValidationError
- if the Great Expectations validation tests pass, we move (rename) the data file to a new folder in the same bucket called
validated - if the validation fails for any reason an error is raised and the file remains in the landing_zone folder
Deploying the Cloud Function
To deploy the Cloud Function code from your local environment we can use the following script .
Ensure you have set your
${PROJECT}and${BUCKET}(data bucket) environment variables. Also ensure that you have enabled the relevant APIs and authenticated yourgcloudterminal before running this command to avoid permissions errors.
gcloud functions deploy data_validation \
    --source cloud_functions/data_validation \
    --entry-point main \
    --project $PROJECT \
    --region europe-west2 \
    --env-vars-file cloud_functions/data_validation/env.yaml \
    --runtime python39 \
    --memory 512MB \
    --trigger-resource $BUCKET \
    --trigger-event google.storage.object.finalize
The Cloud Function is configured to trigger every time a new file is uploaded (or renamed) in the ‘data’ bucket. More information about each argument is given below:
--sourcethe relative location of the Cloud Functions directory on your local machine--entry-pointthe name of the function in themain.pyfile which should be run after the function is triggered--projectyour GCP project name--regionthe region to deploy the cloud function (normally your closest region)--env-vars-filethe location of the file containing the relevant environment variables--runtimePython version--memorythe amount of memory to allocate to the Cloud Function. Note, when loading large files you may need to increase this limit--trigger-resourcethe name of the data bucket--trigger-eventthe type of event which should trigger the function. In our case this is when a file is created in the bucket. See the Google Cloud Functions documentation for a full list of triggers
Demo
That was quite a lot to follow. But we have now successfully configured and deployed our event-driven testing function – let’s try it out!
First, ensure the Great Expectations configurations have been moved into the ‘validation’ bucket before starting. i.e. run the following script (if you have not already done so):
# scripts/move_configs_to_gcs.sh

# Sync the validation bucket configs with the configs stored locally in the great expectations
# folder. Ignore anything in the 'uncommitted' folder and the 'plugins' folder
gsutil -m rsync -r -x 'uncommitted/*|.gitignore|plugins/*' great_expectations gs://$VALIDATION_BUCKET
Next, we need to upload some data to the ‘data’ bucket to trigger the Cloud Function and run the validation.
Remember earlier I created a ‘good ’ and ‘bad ’ version of the example dataset ? We can use these to demonstrate the Great Expectations validation.
Lets upload these files to our ‘data’ bucket into a folder named landing_zone/properties to simulate new files being added to the data lake. This will trigger the Cloud Function twice – once for each file – and run the expectations suite against each dataset.
# scripts/upload_data_to_gcs.sh

# Upload data from data directory to GCS
TARGET_FOLDER=${BUCKET}/landing_zone/properties/

echo "Moving data to ${TARGET_FOLDER}"
gsutil cp data/properties/properties.csv gs://$TARGET_FOLDER
gsutil cp data/properties_bad/properties_bad.csv gs://$TARGET_FOLDER
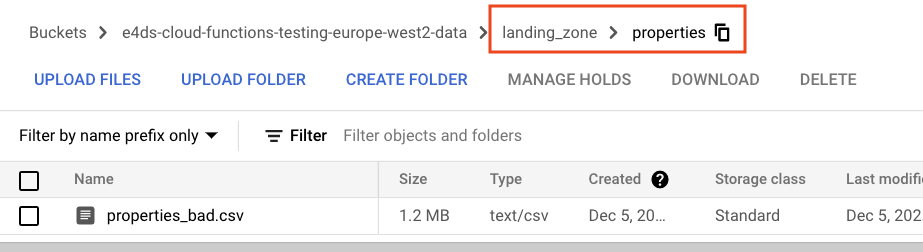
We now have the two files residing in the landing_zone/properties folder in our ‘data’ bucket. (I would show you a screenshot of the two files in the landing_zone bucket but the validation happens too quickly and the files are moved to the ‘validated’ folder before I get the chance!)
Let’s look at the Cloud Function logs to see what happened…
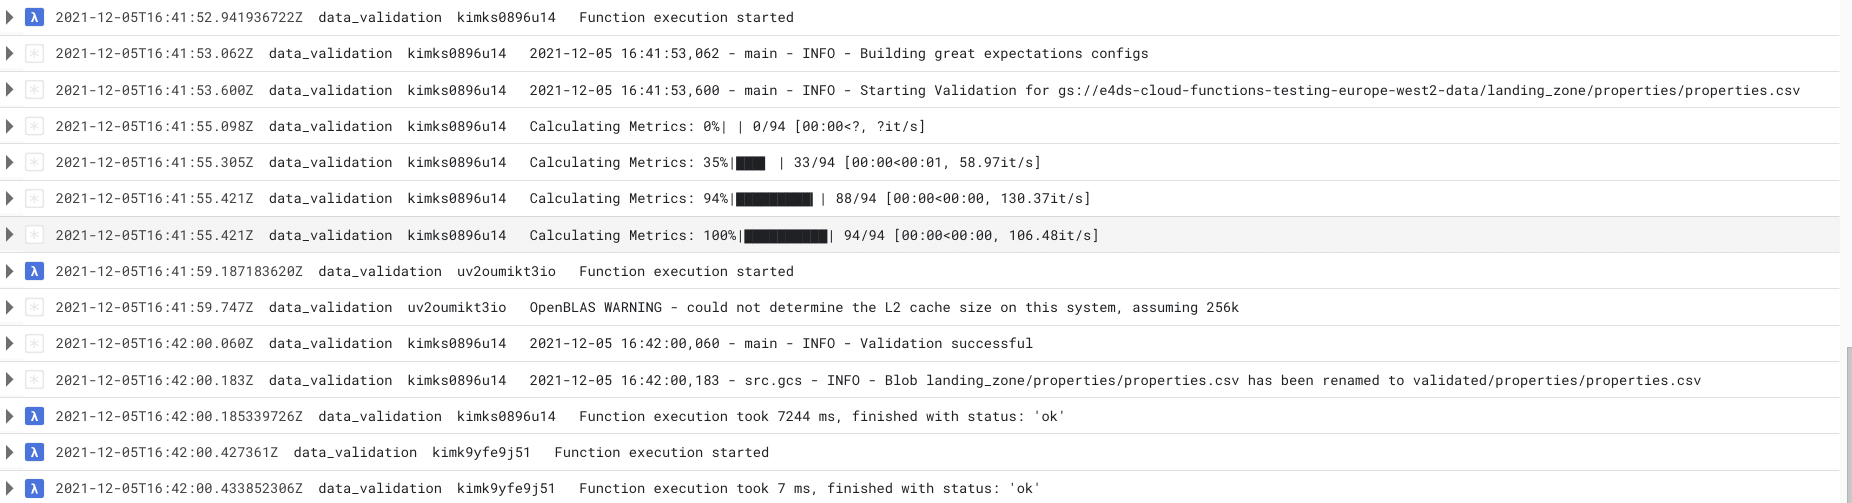
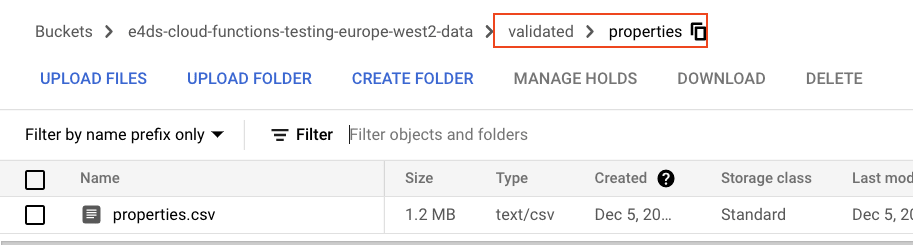
The Cloud Function was triggered for the ‘good’ properties dataset and we can see in the logs the progress of the Great Expectations validation. We then get the INFO log indicating the validation was successful. As the validation was successful the Cloud Function then moves on to rename the data file and place it in the validated/properties folder. This all took about 7 seconds to complete.
Note that the Cloud Function is triggered a second time after moving the file to a new folder. However, this time the function only takes 7 ms and exits without running the validation. As explained in the side note earlier, this second triggering of the function is because moving the file to a new folder counts as ‘creating’ a new file. As this newly created file is not in the target landing_zone folder the Cloud Function exits after checking the file name at the beginning our Cloud Functions code.
We can also inspect the Cloud Functions logs for the ‘bad’ properties data which we expect to fail the validation checks.
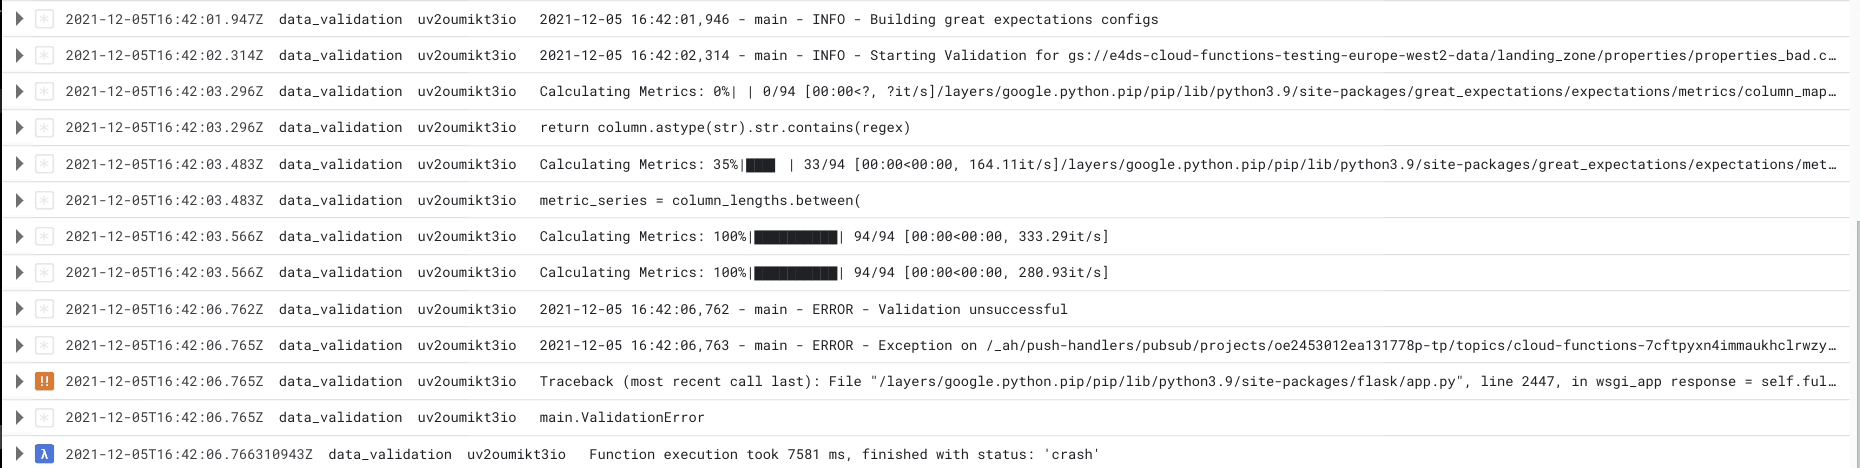
As before, we can track the progress of the validation checks. However, this time the validation is marked unsuccessful and a ValidationError exception is raised and the Cloud Function exits.
Note that even though some of the validation checks failed, all of the checks are still run against the data rather than stopping at the first error. I think this is a big benefit of Great Expectations over conventional methods which typically throw an error at the first occurrence. This allows you to debug and identify issues with the whole dataset, rather than playing ‘whack-a-mole’ and replaying the entire pipeline each time you find and fix an error when it comes up.
We can also track Cloud Function errors (i.e. unsuccessful validations) using the metrics tab of the Cloud Functions UI in GCP. This can be useful for tracking the number of data errors we are getting over a specific time period.
Let’s now view the results in the Great Expectations user interface.
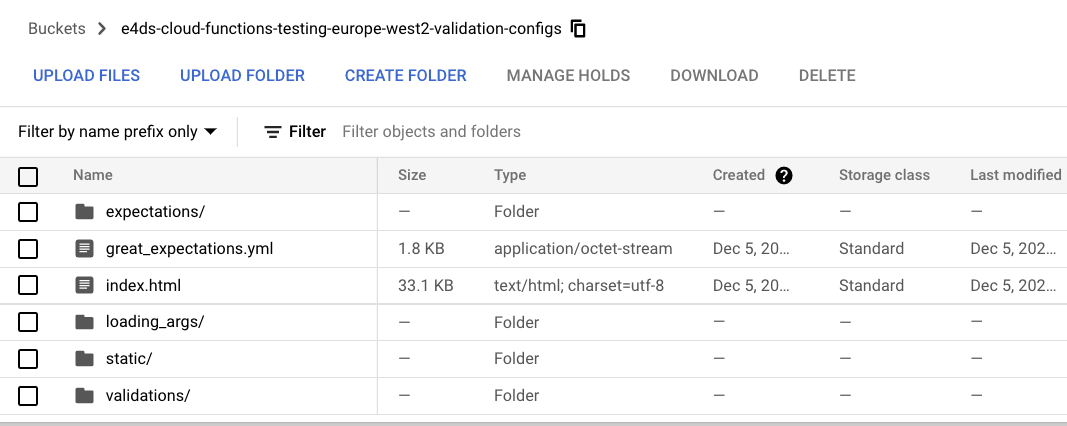
After running the validation checks, Great Expectations will save the data docs HTML artifacts in the ‘validation’ bucket (as specified in our great_expectations.yml file).
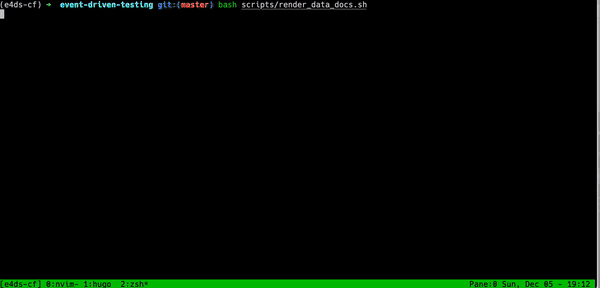
In order to view the results in our browser, we need to copy these files locally. We can do this using the following script
which copies the contents of the validation bucket to our local machine and then opens the index.html home page.
# scripts/render_data_docs.sh

# Copy the data docs to local computer to render the great expectations validation results UI
# Data docs will be available in the data_docs folder which is not under version control
# The index.html will open automatically after running this script
set -e
mkdir data_docs
gsutil -m cp -r gs://$VALIDATION_BUCKET/* ./data_docs/
open data_docs/index.html
We can now inspect the results interactively and identify what the issues were with the ‘bad’ dataset.
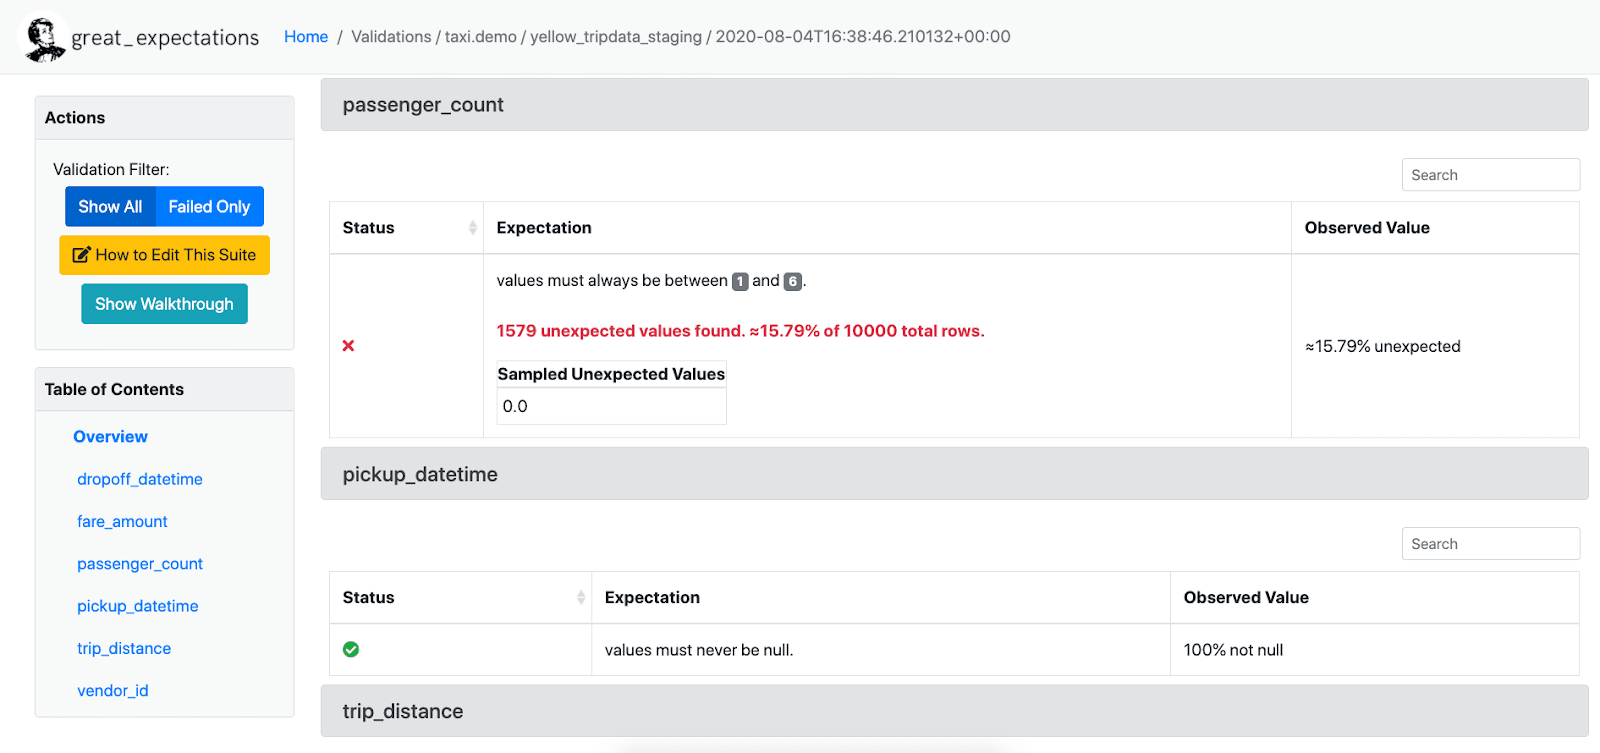
The UI front page shows us a list of validation runs and various metadata such as the time it was run, the name of the file, a link to the expectations suite and most importantly shows us whether the validation run was successful or not.
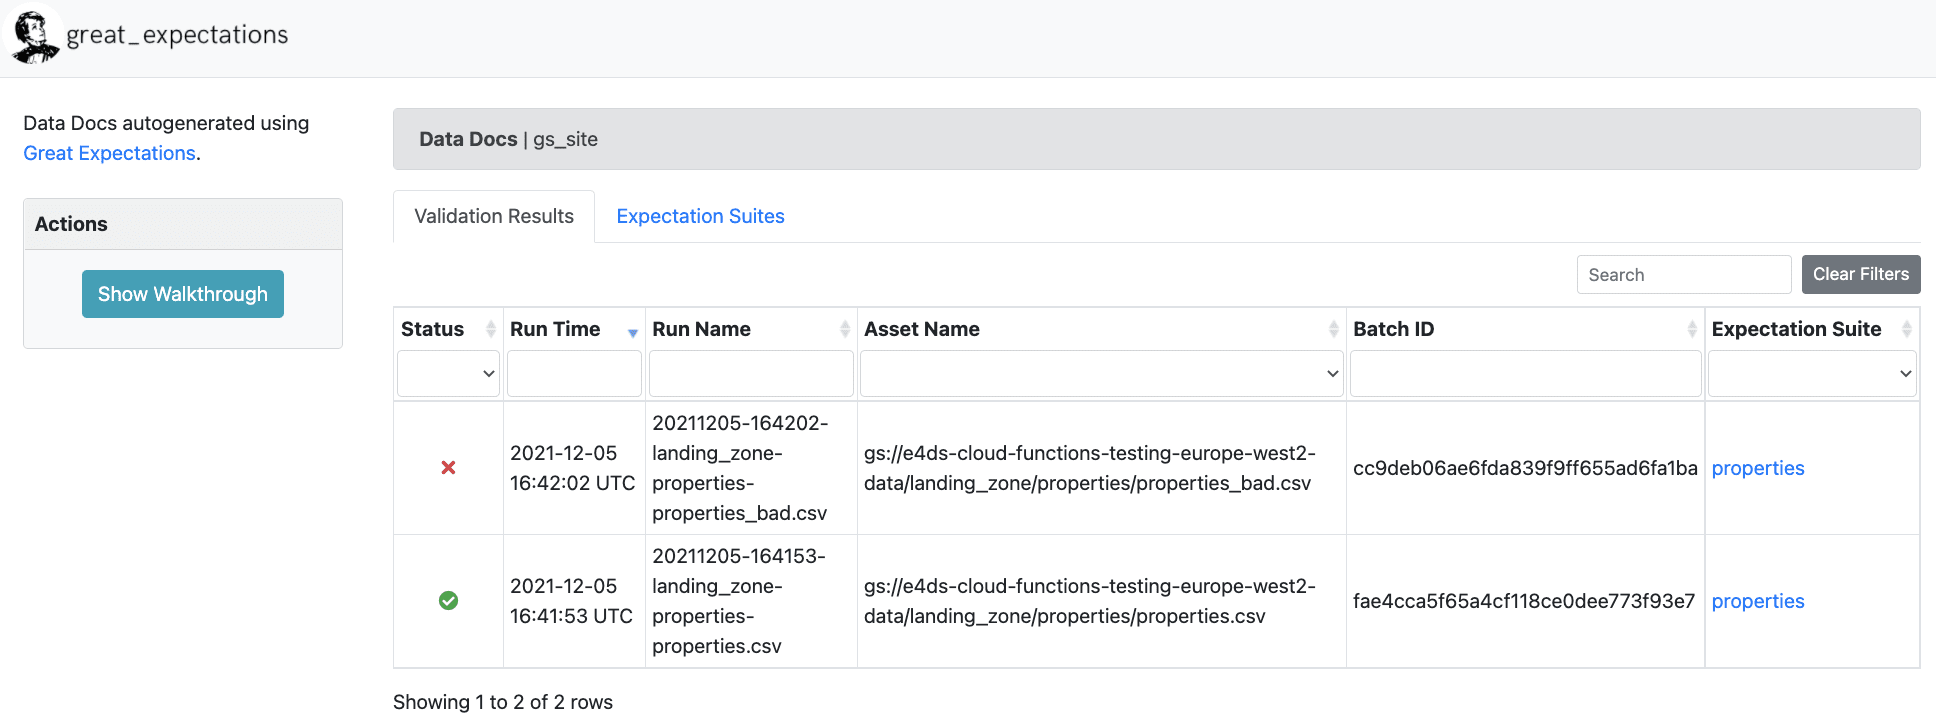
As expected we have a successful run for the ‘good’ data set and a failed run for the ‘bad’ dataset.
We can inspect the failed run more closely by clicking on the failed list item.

The UI tells us that out of the 37 tests (expectations) we ran against the data, 33 were successful and 4 failed.
If we scroll further down we get more information about the failed tests. For example, the total number of rooms for 1,438 rows in the data was not between the expected minimum value of 0 and maximum value of 20. Instead, we have some negative values and some unexpectedly high values. From this result we can go back to the original data source to understand why it might be creating these unrealistic values.

Limitations and Extensions
As mentioned previously, your mileage may vary with the solution described in this post depending on your data requirements. However, for relatively small datasets (i.e. that fit in the memory of a Cloud Function) the proposed architecture might be a nice solution for automatic configuration driven data validation that comes with a nice UI for debugging.
The main limitation is that it might not scale very well to large individual file sizes. Great Expectations loads the data into an in memory Pandas dataframe which can be slow and resource intensive for large datasets. While not discussed in this tutorial, it is possible to configure Great Expectations to run on a spark cluster instead which might improve the scalability.
The current configurations are set up for loading csv files, however, it is possible to use other file types such as avro or parquet by changing the loading_args configuration files.
The method for viewing the data docs in this tutorial requires cloning the contents of the validation bucket to your local computer to open the UI. While this works, it is perhaps not the cleanest solution. It is possible to host the data docs UI as a website on Google App Engine which can be made to be accessible to your team members so they all can have a view of the current data validation results.
Conclusion
Congratulations for reaching the end of this post – it was quite a long one!
We have described the importance of testing and validating data as early as possible in the ingestion process to prevent bad data from propagating through to downstream analytics systems. While conventional data type checks work well for catching errors before loading into the data warehouse, they do not prevent bad quality data (e.g. unexpected negative numbers, outliers etc.) from reaching the warehouse which can cause issues for analytics systems later on.
Libraries such as Great Expectations can be extremely handy for ensuring the quality of your data. The library comes with a wide variety of data tests out-of-the-box making it quick and simple to write extensive tests for your data. The user friendly data docs UI can also aid debugging and help keep track of changes to the data.
We can integrate Great Expectations into serverless products on Google Cloud, such as Cloud Functions, to automate the data testing process as soon as new data lands in the data lake.
Happy Coding!