So you have just bought a new MacBook or looking into doing some data science work on your existing Mac and need to setup a development environment?
This article is a guide for installing and configuring a lean data science development environment on a new MacBook (M1+ or Intel chip).
To get started with data science, you need three basic components:
- A terminal application for launching applications and running programs
- A robust Python environment for development work
- A code editor/integrated development environment such as Jupyterlab or VSCode
The setup guide includes the key tools required for data science workflows with a focus on lightweight tools (minimising installation of unnecessary or large packages) and automation (i.e. using the command line for installation of software where possible).
We will discuss the following tools that I use as the base for a lean and effective workbench for my data science projects:
- Homebrew
- Terminal (iterm2)
- Python (pyenv)
- Code Editor (Jupyterlab and Visual Studio Code)
- Docker
Let’s get into it! 🤘
Installing a System Package Manager
Homebrew
The first step is to install a system package manager. I recommend Homebrew , it is simple to use and just works.
Homebrew is the most popular package manager for MacOS. It is a free and open-source package management system which allows you to easily install applications straight from the command line.
We will use Homebrew to install most of the relevant software for our data science development environment.
Installation instructions are available on the Homebrew homepage
. But essentially, you can paste and run the following command into the Terminal application to install Homebrew.
/bin/bash -c "$(curl -fsSL https://raw.githubusercontent.com/Homebrew/install/HEAD/install.sh)"
The script will also install any relevant dependencies (e.g. Apple’s command line tools for Xcode ) if they are not already installed. Note, this can take a while.
You should follow the on screen instructions to complete the installation setup.
After installing Homebrew, you might be prompted to add Homebrew to your PATH (see screenshot below). Adding Homebrew to your PATH variable allows you to use the brew keyword command in the terminal.
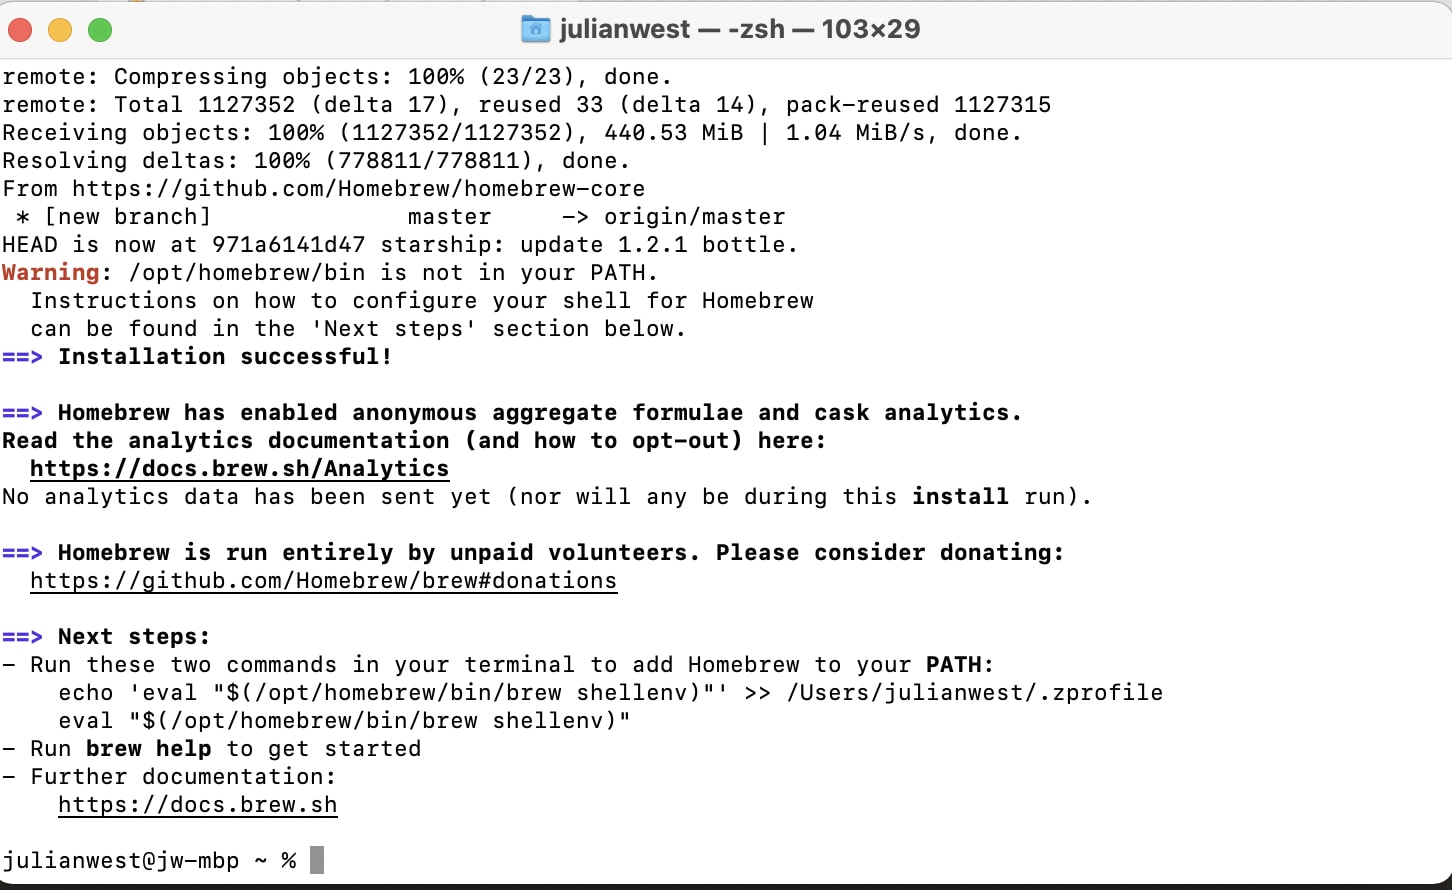
Follow the instructions found in the ‘Next steps’ section of the terminal output to configure your shell. For example, using the snippet below with your username:
# add Homebrew to your path if prompted
echo 'eval "$(/opt/homebrew/bin/brew shellenv)"' >> /Users/<your-username>/.zprofile
eval "$(/opt/homebrew/bin/brew shellenv)"
Programs and Tools
Now, we have a package manager, let’s use it to install some key tools which will be the basis of our development environment setup.
Terminal
I prefer to use iterm2
as my terminal, instead of the standard Terminal application which ships with MacOS.
iterm2 is very customisable and has lots of great features
.
We can install it using Homebrew. Or you can install it directly from the iterm2 website .
# install iterm2 using Homebrew
brew install --cask iterm2
I won’t go into how you can customise iterm2 (e.g. fonts, color schemes etc.) in this post, but there are lots of great tutorials on the web you can look into that explain various customisations.
Now we have installed iterm2 we can use it for the rest of the setup.
Git
Git is essential for managing version control in your projects and collaborating effectively with others. It should be one of the first things you install on your system.
“Everything should be under version control” – The Pragmatic Programmer , David Thomas and Andrew Hunt
Git should already be downloaded as part of the Homebrew installation step above. However, you can also install it using Homebrew:
brew install git
Once installed you should set your global Git credentials (e.g. your GitHub username and email) to identify yourself on your future commits. For example:
git config --global user.name "John Doe"
git config --global user.email johndoe@example.com
You can also setup your SSH keys to authenticate to GitHub. Check out my other article on managing SSH keys for multiple accounts .
If you are new to learning Git, I highly recommend reading Ry's Git Tutorial . It is a free ebook covering the core aspects of using Git and collaborating with others
Python
Now for the good stuff. Installing Python.
But first a word of warning…
⛔️ Do not mess with your system Python
Python will already come installed with MacOS. If you type python or python3 into your terminal application, the Python REPL will open up. Avoid using or installing packages to the Python program already installed on your system. I will refer to this as your ‘system Python’.
While it is possible to use the system’s Python, it is very risky as you may make unintended changes to the environment which adversely affects other programs in your operating system. Additionally, if you ever break anything in your Python environment and want to just completely uninstall and reinstall it you really could be in real trouble. It’s best not to touch it.
See this video from RealPython to understand more about system Python
✅ Keep your development Python environments separate from the system Python
Instead, you should install a separate application such as conda or pyenv to manage your Python environments separately from the system Python.
I prefer to use pyenv to manage my Python versions and virtual environments.
Many tutorials, particularly for data science, will suggest using conda
. However, I find conda (and even miniconda) to be bloated with unnecessary software.
Pyenv is lightweight and makes it very easy to manage multiple versions of Python on the same computer.
Unfortunately, the installation of pyenv is a bit more involved than conda but I think the effort upfront is worth it in the end.
Installing pyenv
Pyenv can be a little tricky to install properly so make sure you read the installation instructions on their GitHub page very carefully.
First you should install the following dependencies documented in the GitHub wiki page :
brew install openssl readline sqlite3 xz zlib
Next, install pyenv
brew install pyenv
Configure your shell
It is easy to miss in the installation instructions, but you also need to configure your shell in order for pyenv to work properly.
The instructions for configuring your shell are (in my opinion) hidden in another part of the documentation – in step 2 of the Basic GitHub Checkout instructions
MacOS and iterm2 use zsh
as the default shell. Therefore you need to run the following commands to initialise pyenv when loading a new session:
echo 'eval "$(pyenv init --path)"' >> ~/.zprofile
echo 'eval "$(pyenv init -)"' >> ~/.zshrc
These commands add some information to your .zprofile and .zshrc configuration files which will automatically initialise pyenv every time you open your terminal.
Close and restart your iterm2 terminal for the changes to take effect.
Install a new Python version
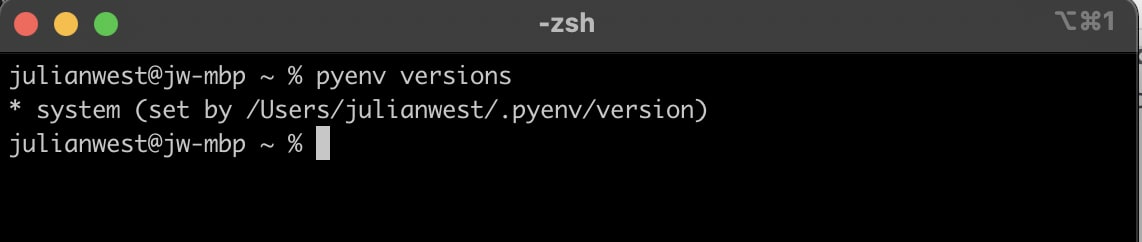
After installing pyenv, the only version Python available to us is still the system Python (avoid using!!).
# list available python versions
pyenv versions
A full list of pyenv commands are available in their COMMANDS.md page.
Therefore we need to install a separate version of Python to use for our projects – for example version 3.10.0:
# install separate python version 3.10.0
pyenv install 3.10.0

# list versions again
pyenv versions
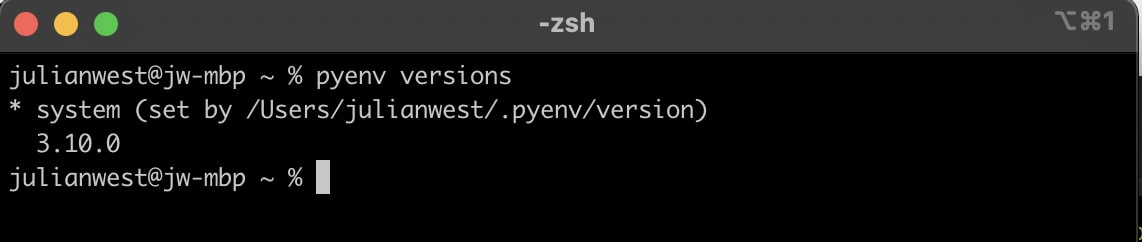
Note: I used v3.10.0 as an example, however, you can install any version of Python you like. Even another 3.8.9 version that is separate to the default. See the Python documentation for a full list of Python versions.
Change the default Python version
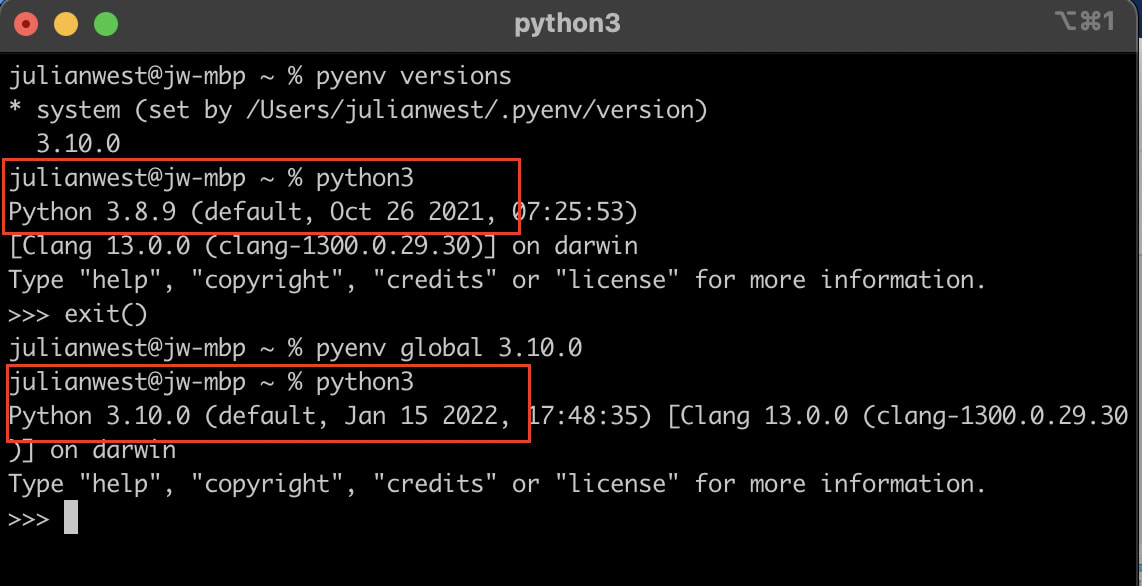
You will notice there is an asterisk next to ‘system’ in the screenshot above. This means that the default Python interpreter is still the system python.
We can use the pyenv global command to set the default Python version to one we just installed.
# set default version to newly installed 3.10.0
pyenv global 3.10.0
If, in the future, you need or want to use a different Python version, you can easily install another python version using pyenv install <version> and then set it as the default using pyenv global <version>.
Installing pyenv-virtualenv for virtual environment management
Now we have a separate Python environment, we need to set up a virtual environment manager to manage Python environments for our specific Python projects.
Here is a primer on virtual environments for an explanation on the importance of keeping separate environments for each of your Python projects
You could use the inbuilt venv
Python module for virtual environments. However, I like to use a pyenv plugin called pyenv-virtualenv
for managing virtual environments which is easy to use and has some great features.
Similar to pyenv, we can use brew to install pyenv-virtualenv and then update our .zshrc config file to enable auto-activation of virtual environments.
Read the instructions in the pyenv-virtualenv GitHub README for more details
# install pyenv-virtualenv plugin
brew install pyenv-virtualenv

# run this command to add a new line to your to .zshrc
echo 'eval "$(pyenv virtualenv-init -)"' >> ~/.zshrc
Close and restart your iterm2 application for the changes to take effect.
pyenv-virtualenv is very easy to use. The main commands are documented on the GitHub README
. As an example you can create a new virtual environment using the following:
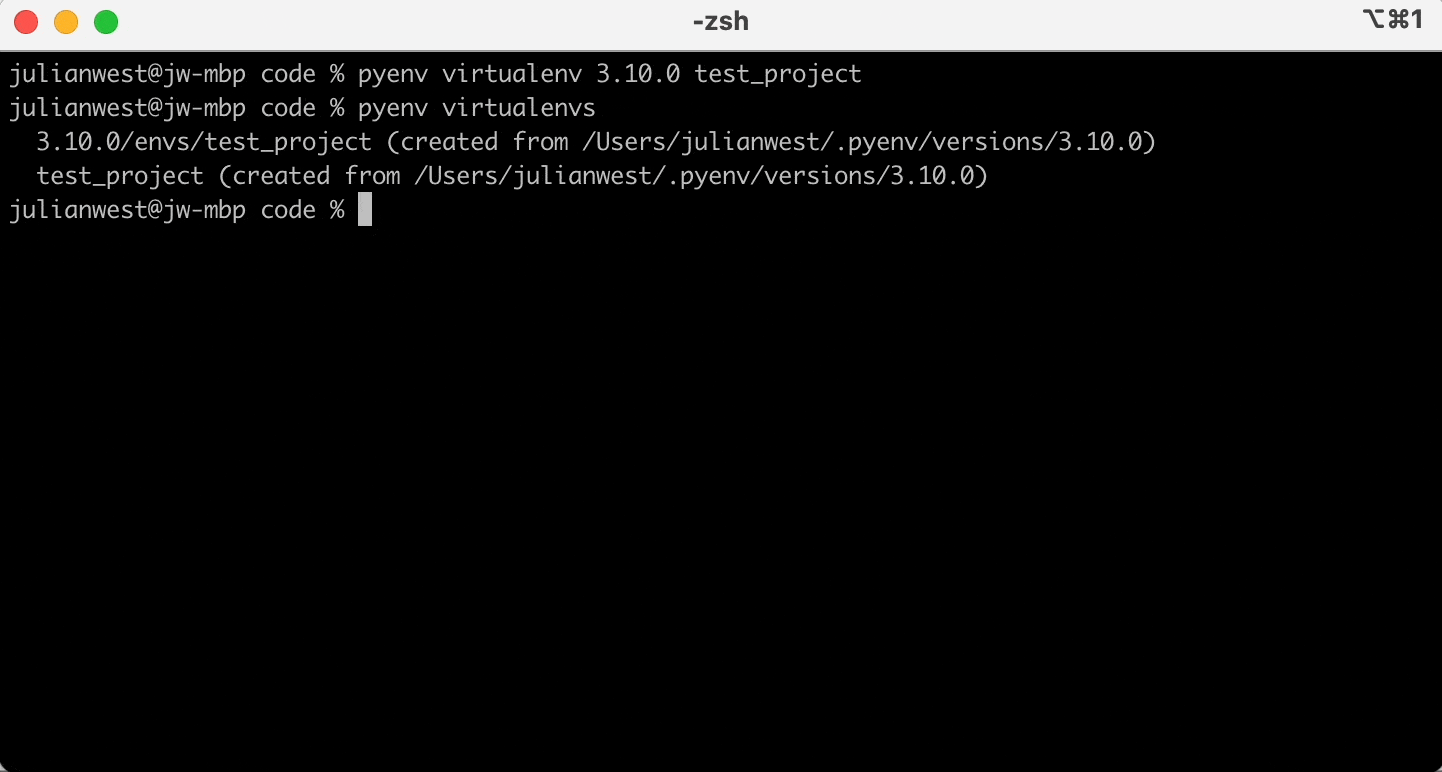
# create new virtualenv (e.g. pyenv virtualenv <python-version> <env-name>)
pyenv virtualenv 3.10.0 test_project

# activate the virtualenv
pyenv activate test_project

# list all available virtual environments
pyenv virtualenvs
A really nice feature of pyenv-virtualenv is that you can set the Python version and virtual environment for each directory so that the correct virtual environment is automatically activated when you navigate to that directory.
# create and navigate to an example directory called 'test_project'
mkdir test_project && cd test_project

# set the 'local' environment to use the 'test_project' virtualenv created above
pyenv local test_project
The pyenv local command will create a .python-version file in your directory which records which virtualenv to use when you are in that directory.
You are now all good to go with your Python setup – just activate your virtual environment and use pip install to install packages into your environment as and when you need them!
JupyterLab
Most data scientists typically work with Jupyter notebooks and Jupyterlab.
JupyterLab can be installed into your virtual environment just like any other Python package.
Note: You could install Jupyter lab ‘globally’, however, I find it best to install it into each virtual environment you use. It ensures the Jupyterlab version remains consistent within your environment and automatically loads the other packages from your current virtual environment into Jupyter the notebook.
For example:
# activate virtual environment if not already activated
pyenv activate test_project

# install jupyterlab into your virtual environment
pip install jupyterlab

# open jupyter lab
jupyter lab

Code Editor
Working from Jupyterlab is great, but for some tasks it is useful to have a more general purpose IDE (integrated development environment).
My preferred IDE (outside of the terminal) is Visual Studio Code .
I was recommended VSCode when I first started. There are many other good options for code editors, such as PyCharm , but I’ve had no issues with VSCode and find it pleasant to use so have stuck with it.
We can install VSCode from the command line (or from their website ):
brew install --cask visual-studio-code
Once installed, you can access VSCode from you applications folder or directly from the terminal using the keyword code, which is quite cool.
Extensions
VSCode has many great features and extensions. My favourite extensions that I install are:
- Python – Python code completion (IntelliSense) and linting support
- Pylance – type checking tool (see my article on the importance of type hinting )
- Jupyter – allows you to create and interact with Jupyter notebooks within VSCode
- GitLense – valuable functionality to improve your Git workflow and keep track of changes
Other useful extensions are:

There is a good tutorial on using Python in VSCode on the VSCode webiste, which is worth checking out if you are new to VSCode
Settings
You can specify various preferences in VScode
, either through their UI or in a settings.json file.
These settings can be useful for defining automatic actions when saving files and enabling other language specific features.
Here is my basic settings.json file which automatically formats your files (using the black Python formatter
) when you press save; organises your import statements and enables type checking
.
# settings.json
{
    "editor.formatOnSaveMode":"file",
    "editor.formatOnSave":true,
    "editor.codeActionsOnSave": { "source.organizeImports": true},
    "python.linting.pylintEnabled":true,
    "python.linting.enabled": true,
    "python.analysis.typeCheckingMode": "strict",
    "python.formatting.provider": "black",
}
These settings help keep your projects and Python files tidy and compliant with PEP8 formatting conventions which helps with readability .
Docker (Optional)
Docker is an open source platform for building containerized applications. Although general data science workflows and development can happen outside of Docker containers (e.g. in virtual environments), most applications will be eventually deployed in some sort of containerised environment in production.
I have marked installing Docker as optional because it isn’t necessarily required for data science. But developing your applications in a containerised environment is a great way to improve the reproducibility of your analysis and avoid the dreaded “It worked on my machine!” syndrome. It also reduces the gap between development environments and production which will enable you to deploy models faster and with fewer issues.
I highly recommend aspiring data scientists learn the basics of Docker. There is a fantastic YouTube channel called TechWorld with Nana which has an excellent beginner tutorial series for Docker – really worth checking out if you are just getting started with learning Docker.
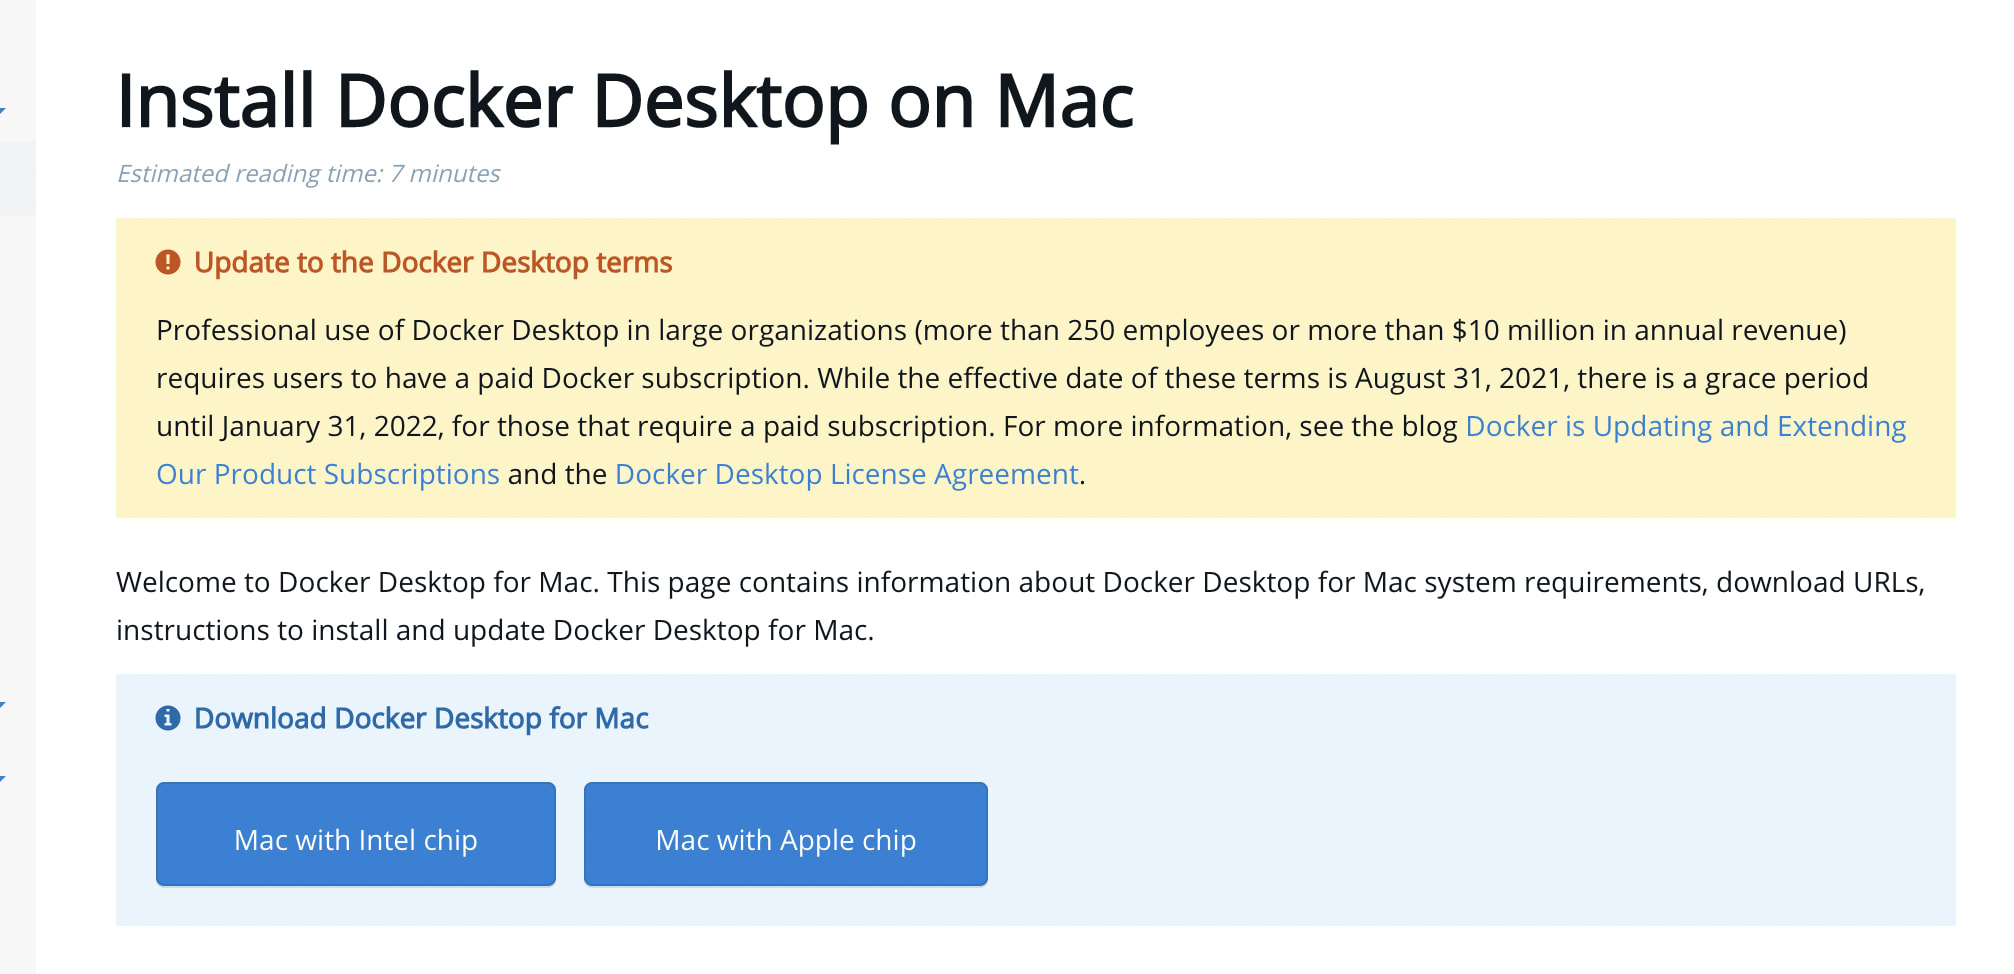
To install Docker, we have to go the Docker website . You should select and install the relevant program for your MacBook (i.e. Intel chip vs Apple Chip)
Conclusion
There we have it! A functional data science environment on MacOS.
This post has covered the steps to create a basic data science workbench on MacOS:
- We installed a system package manager (Homebrew) to easily install applications directly from the command line.
- Next we installed a good terminal application (iterm2) and ensured we had Git installed and configured.
- Then we moved onto setting up a robust Python environment using pyenv and the pyenv-virtualenv plugin.
- The pyenv setup involved first installing some dependencies (e.g.openssl, readline, sqlite3, xz, zlib) and then installing pyenv using Homebrew. We also had to add some information to our
.zprofileand.zshrcconfiguration files in order for pyenv to automatically initialise when opening a new terminal. - We discussed the importance of keeping the Python program that you use for development separate from the system Python in order to prevent you accidentally breaking something with your operating system.
- Finally, we set up VSCode for code editing and installed Docker for containerised application development.
With Homebrew, iterm2, pyenv and VSCode installed and configured correctly you can get a long way towards a productive data science environment.
The next step to supercharge your productivity is customising your terminal application. In a future post I will walk through my terminal configuration
using tmux + vim. Stay tuned! 🚀
Homebrew bonus 💡
Did you know you can also install ‘non-coding’ applications via Homebrew such as Spotify 🤯
brew install --cask spotify
Further Reading
- Five Tips to Elevate the Readability of your Python Code
- Automate your MacBook Development Environment Setup with Brewfile
- SQL-like Window Functions in Pandas
- Gitmoji: Add Emojis to Your Git Commit Messages!
- Do Programmers Need to be able to Type Fast?
- How to Manage Multiple Git Accounts on the Same Machine